Building NestJS Applications with the CQRS Model
Explore building scalable NestJS server-side applications using the Command Query Responsibility Segregation (CQRS) model. Learn to implement commands, queries, and events, understand its benefits over traditional CRUD, and leverage the `@nestjs/cqrs` module for robust design.


Learn to build server-side applications using a stream-oriented architecture or the Command Query Responsibility Segregation (CQRS) model. This approach involves constructing servers that, in a sense, resemble a Redux store.
When servers are built this way, the focus is on writing logic that responds to client actions. These actions can be categorized as either commands or queries. Commands are strictly for modifying data, while queries are dedicated to data retrieval. The third crucial element is events, which enable broadcasting information to other parts of the application when actions occur.
To begin, we'll examine the drawbacks of the commonly used layered/CRUD (Create, Read, Update, and Delete) architecture. Following this, we'll delve into the CQRS pattern, exploring its benefits and drawbacks. Finally, we'll build a simple web server utilizing the community-provided @nestjs/cqrs module.
Prerequisites
To follow this guide, a basic understanding of the NestJS backend framework, HTTP, RESTful APIs, and CRUD operations is assumed.
Project Setup
Assuming you have the Nest CLI installed, let's bootstrap a new application. Open your terminal and run the following command:
nest new cqrs-demo
We've named our working directory cqrs-demo. This command creates a new NestJS project within it. Feel free to choose a different directory name.
Next, install the @nestjs/cqrs package, which is the only additional dependency required. From your working directory, execute:
npm i @nestjs/cqrs
General API Architecture
Regardless of the specific architecture employed, virtually all web servers consist of three key components:
- Presentation: This layer defines how the API provides information to the client. For APIs performing server-side rendering (SSR), this might involve rendering HTML. For most modern APIs, it typically means serving JSON.
- Logic Layer: This represents the API's entry point and its processing logic. The entry point is the interface clients use to connect to the web server application. For the server, this is where it listens for and retrieves client requests. A web server can expose one or more endpoints for client connections. The Application Logic layer then encapsulates all the processing and business logic required to handle these client requests.
- Data Layer: This refers to the database and any supporting logic responsible for data persistence.
The CRUD/Layered Architecture
In this section, we'll explore the CRUD/layered architecture, which is the simplest and most common approach for building server-side applications. We'll discuss its advantages and disadvantages.
In CRUD applications, controllers receive user requests and pass them to services, which encapsulate all business logic. Services also directly interact with the persistence layer to store and retrieve user data as needed. Once a response is generated, controllers forward it back to the client.
Advantages of CRUD
- CRUD is suitable for small applications that are not expected to undergo extensive changes.
- It works well when exposing data and logic not tied to core business processes.
- It offers a simple and intuitive starting point for learning server-side application development.
Disadvantages of CRUD
- In CRUD applications, services often become bloated as they hold all the logic for both reading from and writing to the database, potentially leading to slower throughput.
- CRUD applications typically map HTTP verbs directly to data manipulation operations (e.g.,
GETtoSELECT,POSTtoINSERT,DELETEtoDELETE). This can make the API overly focused on data rather than the business processes surrounding that data, resulting in a rigid design that struggles to adapt to evolving business requirements. - Its unopinionated architecture can easily lead to poor design and a lack of scalability due to the absence of a strict way to organize application logic.
CQRS / Stream-Oriented Architecture Brief
Here's a diagram illustrating the basic flow of the CQRS model.
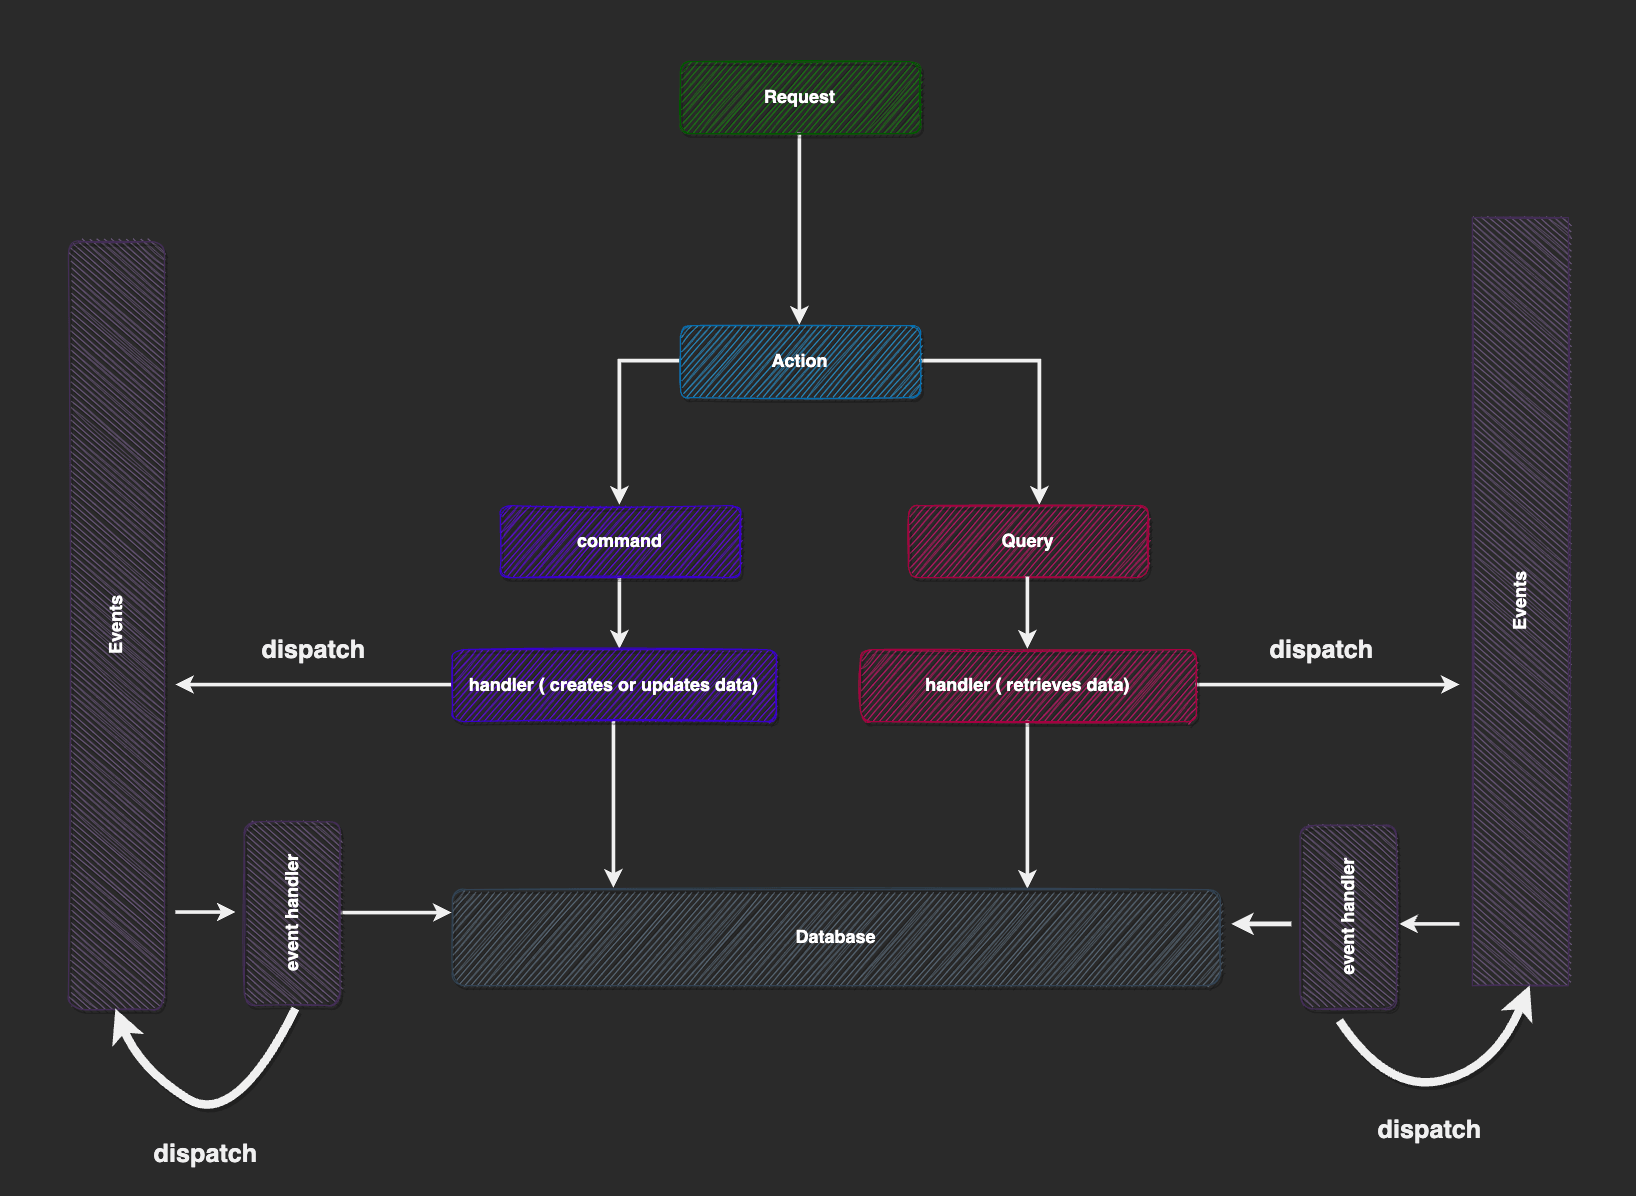
This model also incorporates controllers, services, and repositories, similar to the CRUD model. However, the key difference lies in the expected usage order of these structures. When a client's request is received by the controller, it is mapped to an "action"—a plain object that can be either a query or a command.
- Queries: These are objects containing a payload used to read data from the application. They should not be confused with URL query parameters, although a query object might include them. For example, a query object could be used to retrieve user information.
- Commands: These are objects holding a payload required to mutate application state and perform side effects. For instance, a command could carry information to create a user. Query and command payloads are passed to their respective handler functions to execute the desired task.
Command or query handlers may also choose to notify the system by emitting events. Similarly, event handlers (or listeners) receive event payloads to perform post-processing on the server. Event listeners can also dispatch other events, commands, or queries.
Several differences distinguish commands, queries, and events:
- Event handlers always execute lazily in the background; clients do not wait for a result from event handlers. In contrast, for commands and queries, the handler's results are sent back to the client.
- Only one handler can be registered per query or command, whereas an event can have one or more registered handlers/listeners.
Let's now examine the advantages and disadvantages of the CQRS model.
Advantages of CQRS
- Separation of Concerns: By allowing developers to separate reads from writes, the system can be easily scaled.
- Better Optimization: A system that is read-heavy or write-heavy can be optimized more effectively in its respective area.
- Works Well with Domain-Driven Design (DDD): This technique enables engineers to build applications that better mimic real business processes, rather than solely focusing on plain data structures.
- Scalability: It scales effectively when building larger applications compared to the CRUD architecture.
Disadvantages of CQRS
- Learning Curve: There is an initial learning curve associated with the pattern.
- Boilerplate Code: It tends to involve more boilerplate code when creating queries, commands, and events with their handlers, which can be overwhelming for small projects.
- Over-engineering: It may not be the best option for simple applications where simplicity is paramount, as it can lead to over-engineering. In such cases, a straightforward CRUD architecture might be preferable.
What We Will Be Building
Now for the practical part. We will build a simple voting application following the CQRS pattern. This application will expose endpoints allowing users to create a poll, view an existing poll, and vote in a poll. The goal of this mini-app is not to focus on the trivial implementation details of a voting app, but rather to demonstrate the building blocks of the CQRS pattern and some internals of the @nestjs/cqrs module we'll be using.
The @nestjs/cqrs Module
Having understood the basic building blocks of the CQRS/stream-oriented architecture model, let's now explore some of the internals of how the @nestjs/cqrs module works before we proceed to build our application.
We begin by defining queries, commands, and event payloads, which are essentially plain classes with one or more instance variables. These classes are not part of NestJS’s dependency injection system; they are relevant to the @nestjs/cqrs module for tracking the names of queries, commands, and events. Developers typically create instances of these classes to set up the payload for an event, query, or command.
Next, we define classes that will act as handlers for them. Query and command handlers are classes that must possess an execute() method, while event handlers must have a handle() method. These methods receive the payload of the expected action.
As stated earlier, events can have multiple handlers. Conversely, queries and commands can have only one handler. If multiple handlers are registered for a command or query, only the latest one is used. Handlers need to be decorated to help the @nestjs/cqrs module identify them.
Finally, we inform NestJS about these handler classes by registering them in their respective modules, as they are still regular providers.
Let's now examine some of the internals of the @nestjs/cqrs module.
A NestJS application is essentially a tree of modules. Each module can contain one or more providers and may reference other modules and their providers. The @nestjs/cqrs itself is also a module.
Consider the diagram below.
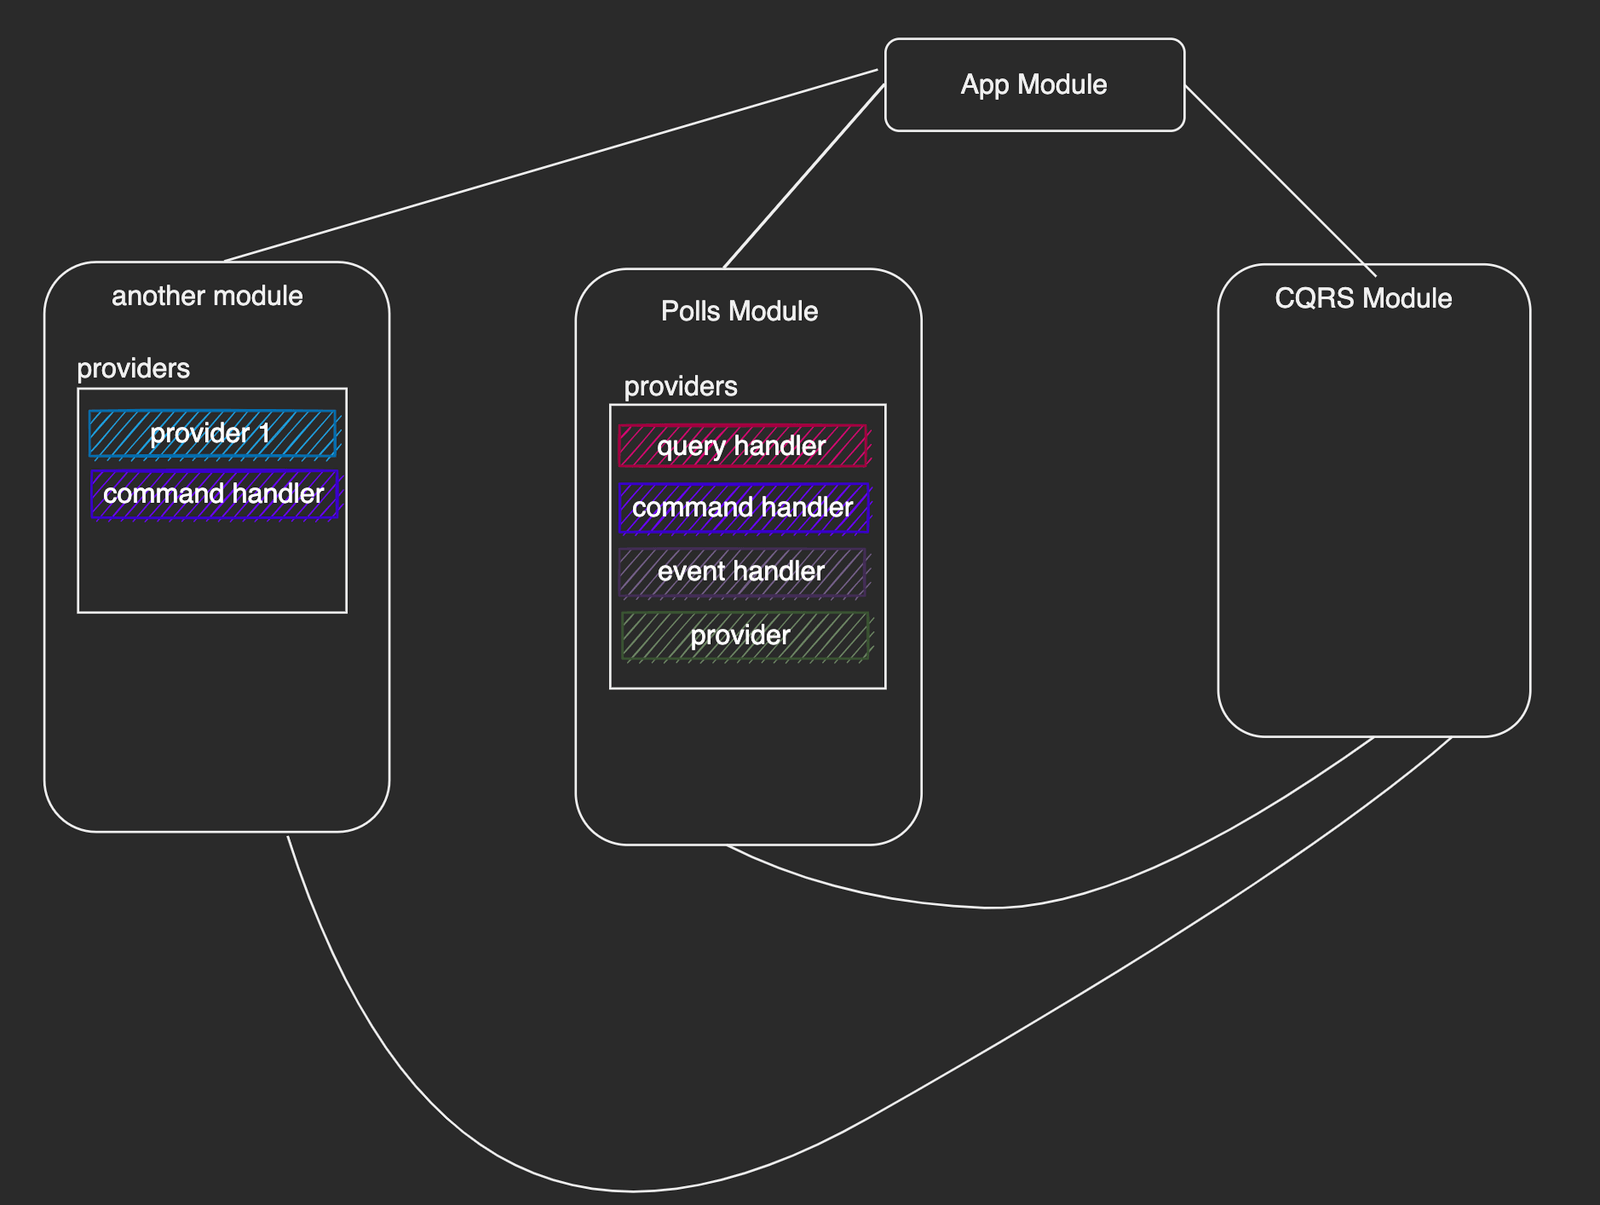
The diagram above shows a simplified NestJS application tree with four modules: the root app module, the CQRS module, our polls module, and a random module. Notice that we've indicated the providers contained within each module. For brevity, providers within the @nestjs/cqrs module are omitted. Let's walk through how this module performs its operations.
When the NestJS application starts, the @nestjs/cqrs module begins by traversing the NestJS application tree. Three separate functions, one for each category (query handlers, command handlers, and event handlers), traverse the tree independently to locate modules containing providers for their respective handler types. Each function can distinguish handlers for its category due to a special decorator used to annotate handler classes during creation.
Upon retrieving providers/handlers for each category, control is then passed to the query bus, the command bus, and the event bus. These three are the central points for all interactions with the @nestjs/cqrs module.
The query bus and the command bus utilize an internal map data structure. The command bus maps commands to their handlers, and the query bus does likewise for queries. This is a one-to-one mapping, meaning there can only be one handler per query and one handler per command, as illustrated below:
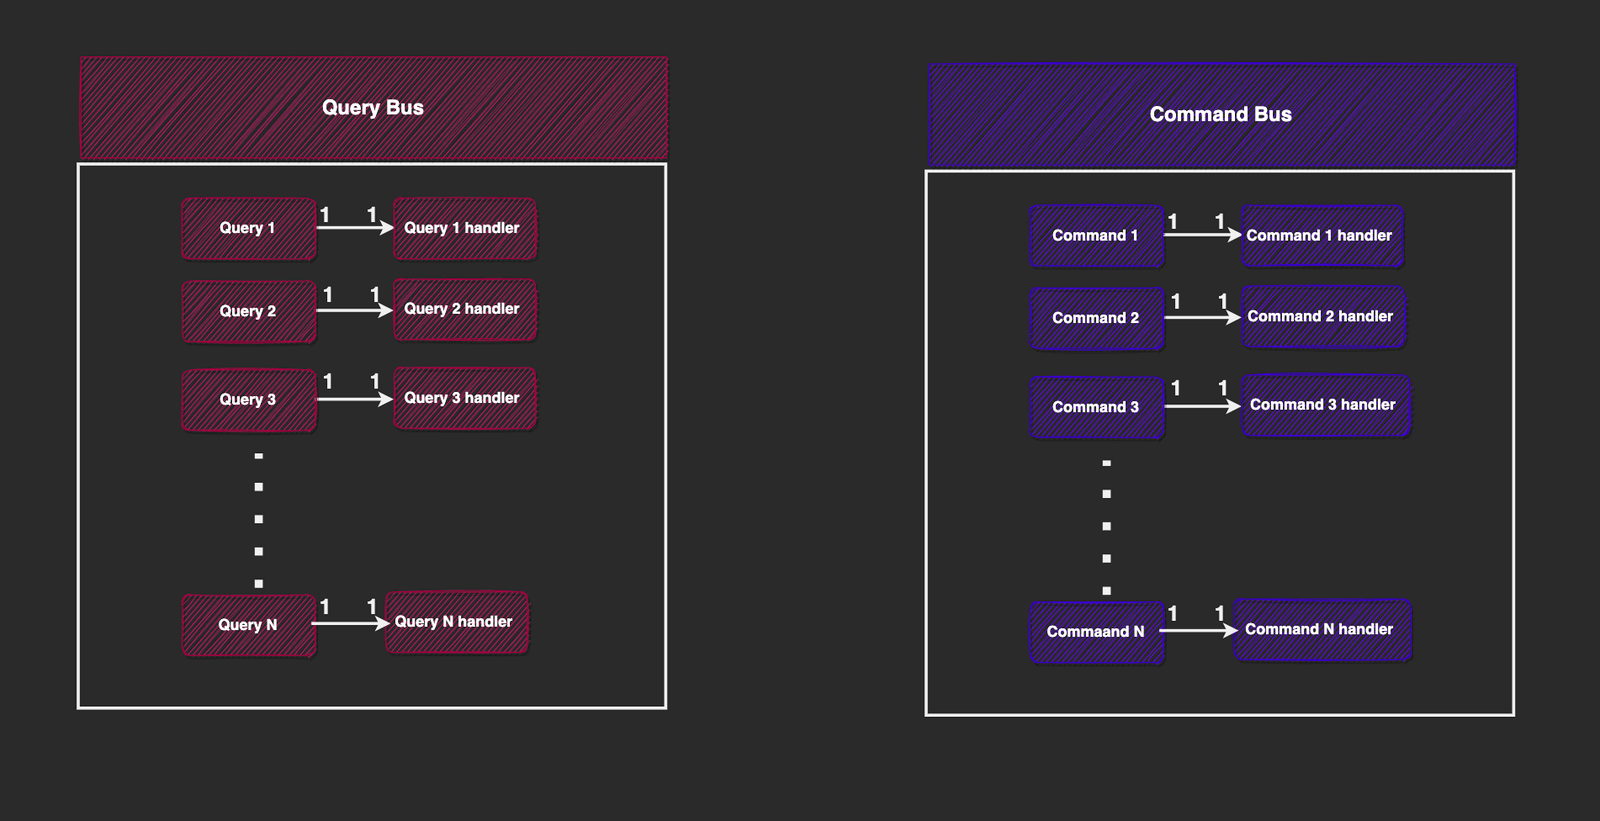
Therefore, whenever we want to dispatch a query, we interact directly with the query bus, providing it with the query payload. It then checks its internal map, locates the appropriate handler, and invokes it. The same principle applies to the command bus.
This is why queries or commands are executed within the request context—the results from their handlers can be sent back to the client.
If a command or query is dispatched and its handler is not found in the registry's map data structure, an error is thrown.

Developers can handle these errors manually or propagate them to an exception filter registered in the system to send a response to the client.
The event bus operates quite differently, as shown below:
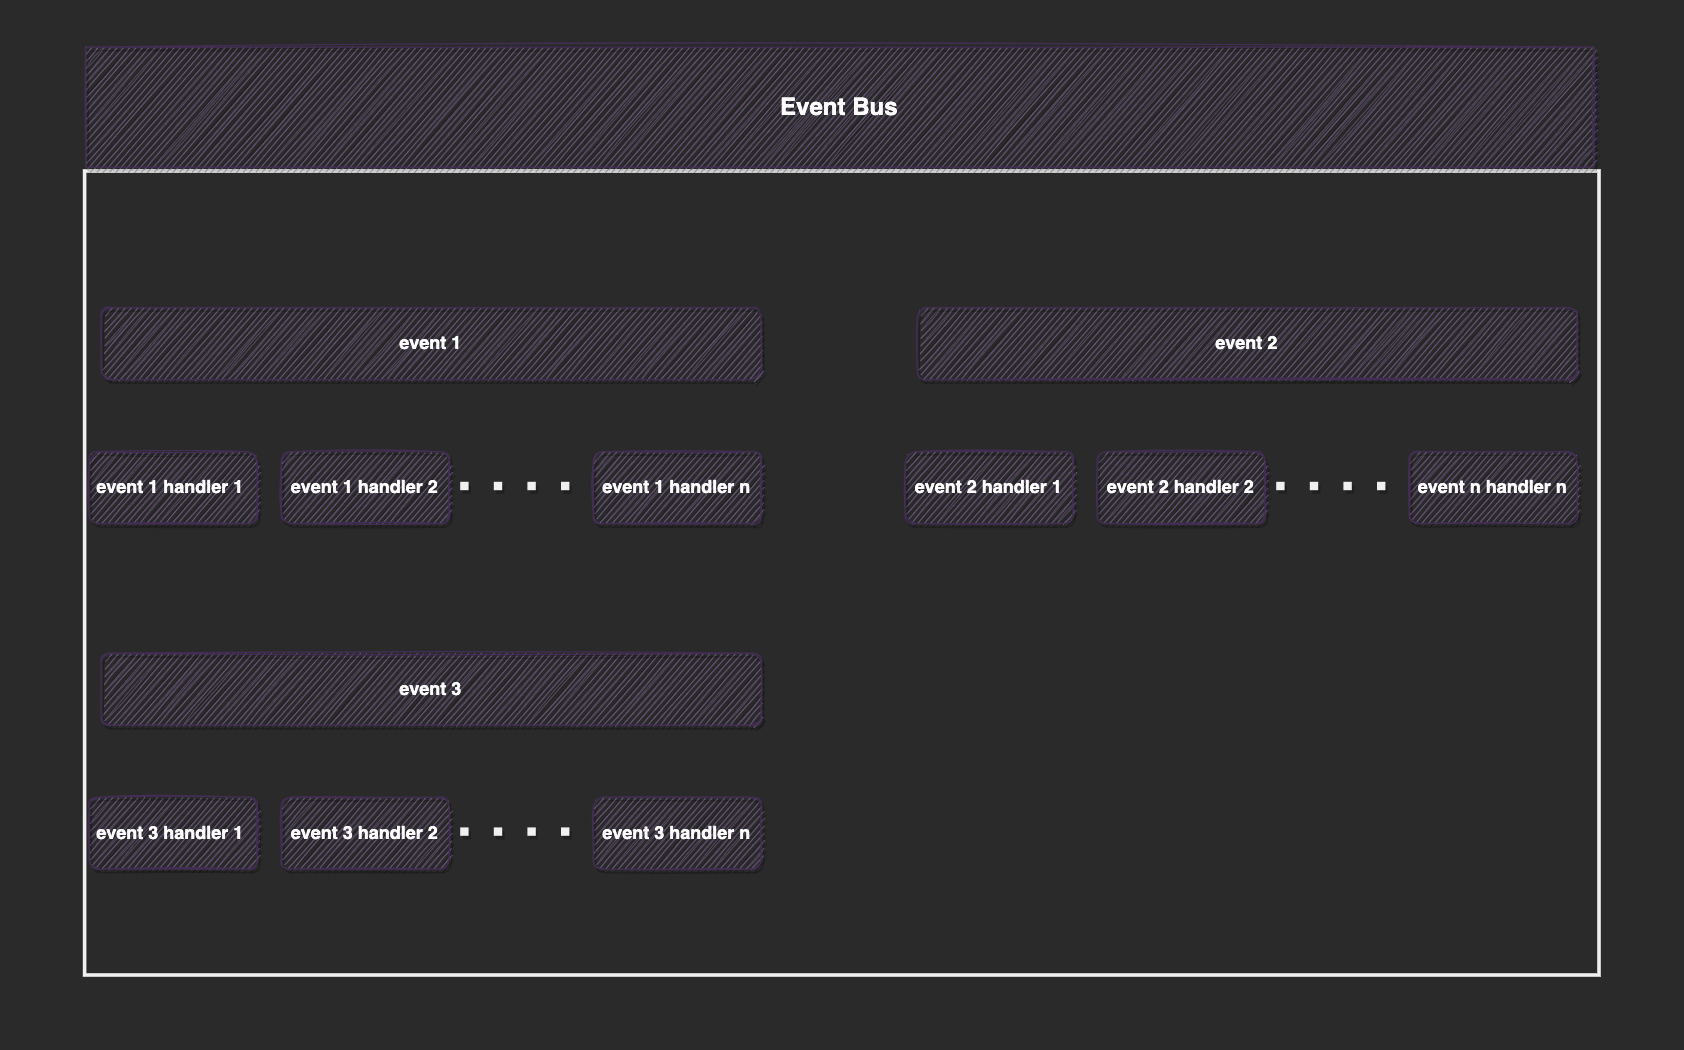
The core of the event bus uses observables and executes asynchronously. By default, it starts with one observable stream. Then, each event handler creates a new observable from this root stream that listens for a particular event and subscribes to it.
This model allows one event to have many listeners, and all event handlers are connected to one central event stream source.
For example, when an event X arrives at the event bus, it is fed to the root observable stream, which then propagates to child streams. Listeners for event X then proceed to execute their logic in reaction to it, while listeners not interested in X simply ignore it.
If the logic within an event handler generates an unhandled error, that error is propagated to a separate observable. Developers can subscribe to this observable to handle errors appropriately.
We can interact directly with the event bus or through one of its abstractions, such as the event publisher. More on this will be discussed later.
Building the Demo App
Let's now proceed to build our mini-app using the @nestjs/cqrs module. We will cover the following steps:
- Setting up the poll module
- Initializing
@nestjs/cqrs - Adding queries
- Adding our commands [create poll and vote]
- Adding events
- Sagas
Setting up the Poll Module
Our application will feature a single module named PollsModule. Using the Nest CLI, let's create this module:
nest g mo polls
Unless explicitly stated, all terminal commands from this point onward assume you are within the polls folder.
Next, within the newly created polls folder, locate the polls.module.ts file and update it as follows:
import { Module } from "@nestjs/common";
import { PollsController } from "./controllers/polls.controller";
import { PollsService } from "./service/polls-service";

@Module({
  controllers: [PollsController],
  providers: [PollsService],
})
export class PollsModule {}
Currently, our PollsModule includes PollsController and PollService. Let's create these files:
mkdir controllers && touch controllers/polls.controller.ts
mkdir services && touch services/pollsService.tsx
Update the polls.controller.ts file with the following:
import {
  Body,
  Controller,
  Delete,
  Get,
  HttpStatus,
  Param,
  Patch,
  Post,
} from "@nestjs/common";

@Controller("polls")
export class PollsController {
  constructor() {}

  @Post("create")
  async createPoll() {}

  @Post("/vote")
  votePoll() {}

  @Get(":id")
  getPoll(@Param("id") id: string) {}
}
The controller provides three endpoints: to create a poll, vote for a poll, and retrieve a poll by its ID.
Next, let's update the pollsService.tsx file with the following:
import { BadRequestException, NotFoundException } from "@nestjs/common";
import { Poll } from "../poll.interface";

export class PollsService {
  private polls: Poll[] = [
    {
      "id": "1",
      "name": "what is your favorite frontend javascript framework",
      "createdAt": "2025-06-22T06:59:49.132Z",
      "options": [
        { "option": "Angular", "votes": 0 },
        { "option": "Vue", "votes": 0 },
        { "option": "React", "votes": 0 },
      ],
      "ended": false,
    },
  ];

  savePoll(poll: Poll): Poll {
    this.polls.push(poll);
    return poll;
  }

  findPollbyId(id: string) {
    return this.polls.find((p) => p.id === id);
  }

  votePoll(pollId: string, option: string): Poll | undefined {
    const poll = this.findPollbyId(pollId);
    if (!poll) throw new BadRequestException();
    const opt = poll.options.find((o) => o.option === option);
    if (opt) opt.votes++;
    return poll;
  }
}
Our PollService contains functions that allow us to create, find by ID, and vote in a poll. For simplicity, we've used an in-memory array of polls instead of an actual database.
For context on the structure of a Poll, the poll.interface file holds a few type definitions:
export interface PollOption {
  option: string;
  votes: number;
}

export interface Poll {
  id: string;
  name: string;
  createdAt: Date;
  options: PollOption[];
  ended: boolean;
}
Initializing @nestjs/cqrs
Update the src/app.module.ts file to appear as follows:
import { Module } from "@nestjs/common";
import { AppController } from "./app.controller";
import { AppService } from "./app.service";
import { CqrsModule } from "@nestjs/cqrs";
import { PollsModule } from "./polls/polls.module";

@Module({
  imports: [CqrsModule.forRoot(), PollsModule],
  controllers: [AppController],
  providers: [AppService],
})
export class AppModule {}
In the code above, we've mounted two modules to our application tree: the PollsModule and the CqrsModule, using its forRoot() method. We will explain some of the internals of the forRoot() method in subsequent sections.
Adding Queries
Queries enable us to read data. Our application will have one query to read a poll. When creating a query, we need to define both the query payload and its handler function.
Assuming you are in the polls folder, run the following commands:
mkdir -p queries/get-poll
cd queries/get-poll
touch get-poll.query.ts get-poll.handler.ts
Now, update the get-poll.query.ts file to match the following:
import { Query } from "@nestjs/cqrs";
import { Poll } from "src/polls/poll.interface";

export class GetPollQuery extends Query<Poll> {
  constructor(public readonly id: string) {
    super();
  }
}
Our query payload expects the poll's identifier, and its handler is expected to return a Poll object. By extending the Query class and providing Poll as a type argument, we specify the return type for the handler.
Next, let's update the get-poll.handler.ts file with the following:
import { Injectable, NotFoundException } from "@nestjs/common";
import { IQueryHandler, QueryHandler } from "@nestjs/cqrs";
import { GetPollQuery } from "./get-poll.query";
import { PollsService } from "src/polls/service/polls-service";
import { Poll } from "src/polls/poll.interface";

@QueryHandler(GetPollQuery)
export class GetPollHandlerService implements IQueryHandler<GetPollQuery> {
  constructor(private readonly pollsRepository: PollsService) {}

  async execute(query: GetPollQuery): Promise<Poll> {
    const poll = this.pollsRepository.findPollbyId(query.id);
    if (!poll) {
      throw new NotFoundException(`Poll with id ${query.id} not found`);
    }
    return poll;
  }
}
By passing the GetPollQuery class to the @QueryHandler decorator, we designate the GetPollHandlerService class as the handler for GetPollQuery commands.
Every query handler must implement the IQueryHandler interface, which has a single method named execute. This method receives the query payload as a parameter. In our case, the function retrieves the poll data or throws an error if it's not found.
We also need to register our GetPollHandlerService so that the CQRS module is aware of it. Let's include it in our PollsModule.
Update the polls.module.ts file with the following:
import { Module } from "@nestjs/common";
import { PollsController } from "./controllers/polls.controller";
import { PollsService } from "./service/polls-service";
import { GetPollHandlerService } from "./queries/get-poll/get-poll.handler";

@Module({
  controllers: [PollsController],
  providers: [PollsService, GetPollHandlerService],
})
export class PollsModule {}
Finally, in our controller, let's map the client's request to a GetPollQuery command:
import {
  Body,
  Controller,
  Delete,
  Get,
  HttpStatus,
  Param,
  Patch,
  Post,
} from "@nestjs/common";
import { CommandBus, QueryBus } from "@nestjs/cqrs";
import { GetPollQuery } from "../queries/get-poll/get-poll.query";

@Controller("polls")
export class PollsController {
  constructor(private readonly queryBus: QueryBus) {}

  @Get(":id")
  async getPoll(@Param("id") id: string) {
    const poll = await this.queryBus.execute(new GetPollQuery(id));
    return poll;
  }
}
The code above begins by injecting the query bus. In the route handler, we dispatch the GetPollQuery. Internally, the query bus retrieves the GetPollHandlerService instance and feeds it the query payload, which then retrieves and returns the poll data.
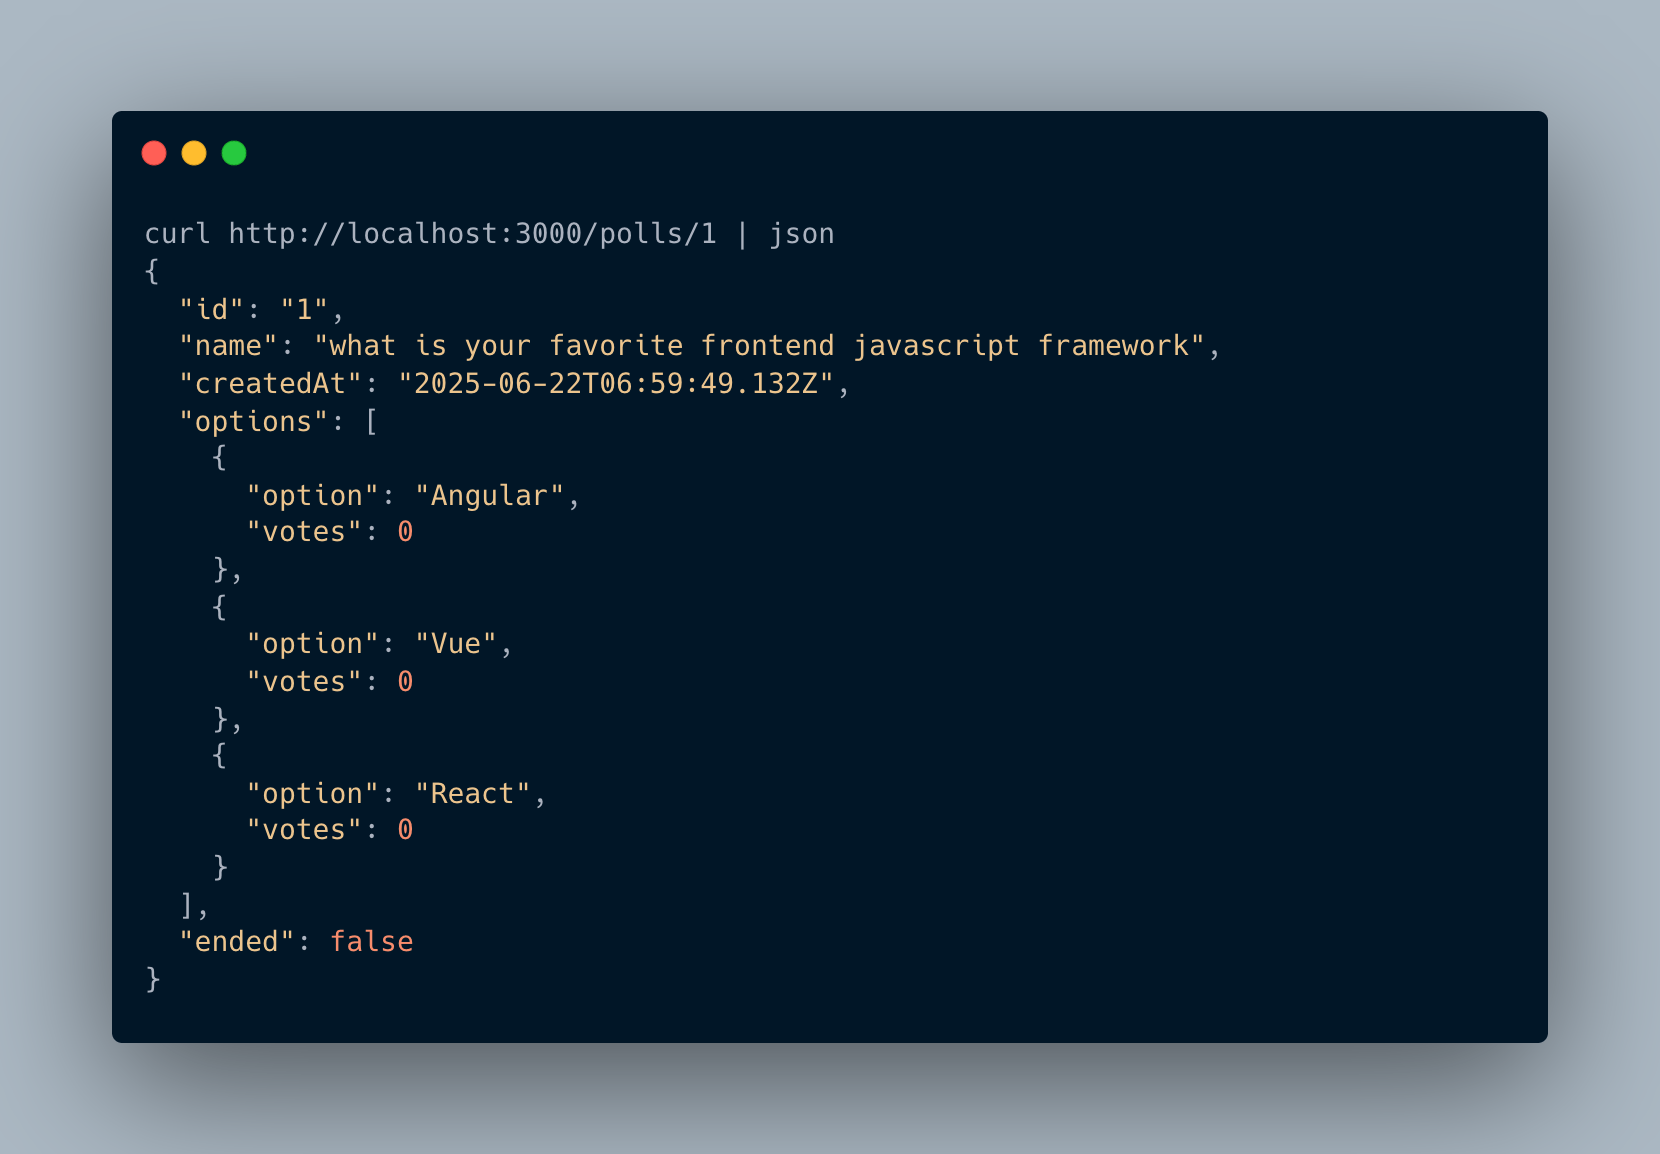
To test the running application, open your terminal and run:
npm run start:dev
Let's now test our newly created endpoint:
Adding Commands
To reiterate, commands are state-changing operations. Our application will have two commands:
- Create poll
- Vote poll
We will defer the "vote poll" command to the next section when we discuss events. For now, let's focus on creating polls. This involves two steps:
- Creating the command payload
- Writing command handlers
In our application, all poll commands will reside within the polls/command folder.
Assuming you are in the polls folder, run the following commands:
mkdir -p commands/create-poll
cd commands/create-poll/
touch create-poll.command.ts create-poll.handler.ts
The command above creates files to hold the create poll command and its handler function.
Update the create-poll.command.ts file to look like this:
import { Command } from "@nestjs/cqrs";
import { CreatePollDto } from "../../dto/create-poll.dto";

export class CreatePollCommand extends Command<{ id: string }> {
  constructor(public pollData: CreatePollDto) {
    super();
  }
}
The CreatePollCommand is a simple class with a public pollData property, which is a DTO that looks like this:
mkdir -p dto
touch dto/create-poll.dto.ts
Update the dto/create-poll.dto.ts file with the following:
export class CreatePollDto {
  name: string;
  options: string[];
}
The name represents the poll's title, and options are the available choices for voting.
Similar to queries, when defining commands, we can optionally specify the return type when the command is executed. Notice that we extended the Command class to specify this. In our case, we expect our dummy create poll command to return an object containing the ID of the created poll.
Next, let's define the command handler. Proceed to update the create-poll.handler.ts file with the following:
import { Injectable } from '@nestjs/common';
import { CommandHandler, ICommandHandler } from '@nestjs/cqrs';
import { CreatePollCommand } from './create-poll.command';
import { PollsService } from 'src/polls/service/polls-service';
import { Poll } from 'src/polls/poll.interface';

@CommandHandler(CreatePollCommand)
export class CreatePollHandlerService implements ICommandHandler<CreatePollCommand> {
  constructor(private readonly pollService: PollsService) {}

  async execute(command: CreatePollCommand): Promise<{ id: string }> {
    const { name, options } = command.pollData;
    const poll: Poll = {
      id: Math.random().toString(36).replace(".", ""),
      name,
      createdAt: new Date(),
      options: options.map((option) => ({
        option,
        votes: 0
      })),
      ended: false,
    };
    this.pollService.savePoll(poll);
    return { id: poll.id };
  }
}
The @CommandHandler decorator receives a Command as its parameter. It labels the CreatePollHandlerService class as a handler for the CreatePollCommand.
Every command handler must implement the ICommandHandler interface, which has a single method called execute. This method receives the command payload as its argument. Our implementation simply creates a dummy poll and stores it in our polls array using the injected PollService.
Notice that it returns an object with an id property, which aligns with the return type we specified when creating the command payload instance.
Next, let's register the command handler with our PollsModule:
import { Module } from "@nestjs/common";
import { PollsController } from "./controllers/polls.controller";
import { PollsService } from "./service/polls-service";
import { GetPollHandlerService } from "./queries/get-poll/get-poll.handler";
import { CreatePollHandlerService } from "./commands/create-poll/create-poll.handler";

@Module({
  controllers: [PollsController],
  providers: [PollsService, GetPollHandlerService, CreatePollHandlerService],
})
export class PollsModule {}
Finally, in our controller, let's map the client's request to a CreatePollCommand:
Update the polls.controller.ts file with the following:
import {
  Body,
  Controller,
  Delete,
  Get,
  HttpStatus,
  Param,
  Patch,
  Post,
} from "@nestjs/common";
import { CommandBus, QueryBus } from "@nestjs/cqrs";
import { CreatePollCommand } from "../commands/create-poll/create-poll.command";
import { GetPollQuery } from "../queries/get-poll/get-poll.query";
import { CreatePollDto } from "../dto/create-poll.dto";

@Controller("polls")
export class PollsController {
  constructor(
    private readonly commandBus: CommandBus,
    private readonly queryBus: QueryBus
  ) {}

  @Post("create")
  async createPoll(@Body() createPollDto: CreatePollDto) {
    const res = await this.commandBus.execute(new CreatePollCommand(createPollDto));
    return {
      message: "Poll created",
      data: {
        pollId: res.id,
      },
    };
  }

  @Get(":id")
  async getPoll(@Param("id") id: string) {
    const poll = await this.queryBus.execute(new GetPollQuery(id));
    return poll;
  }
}
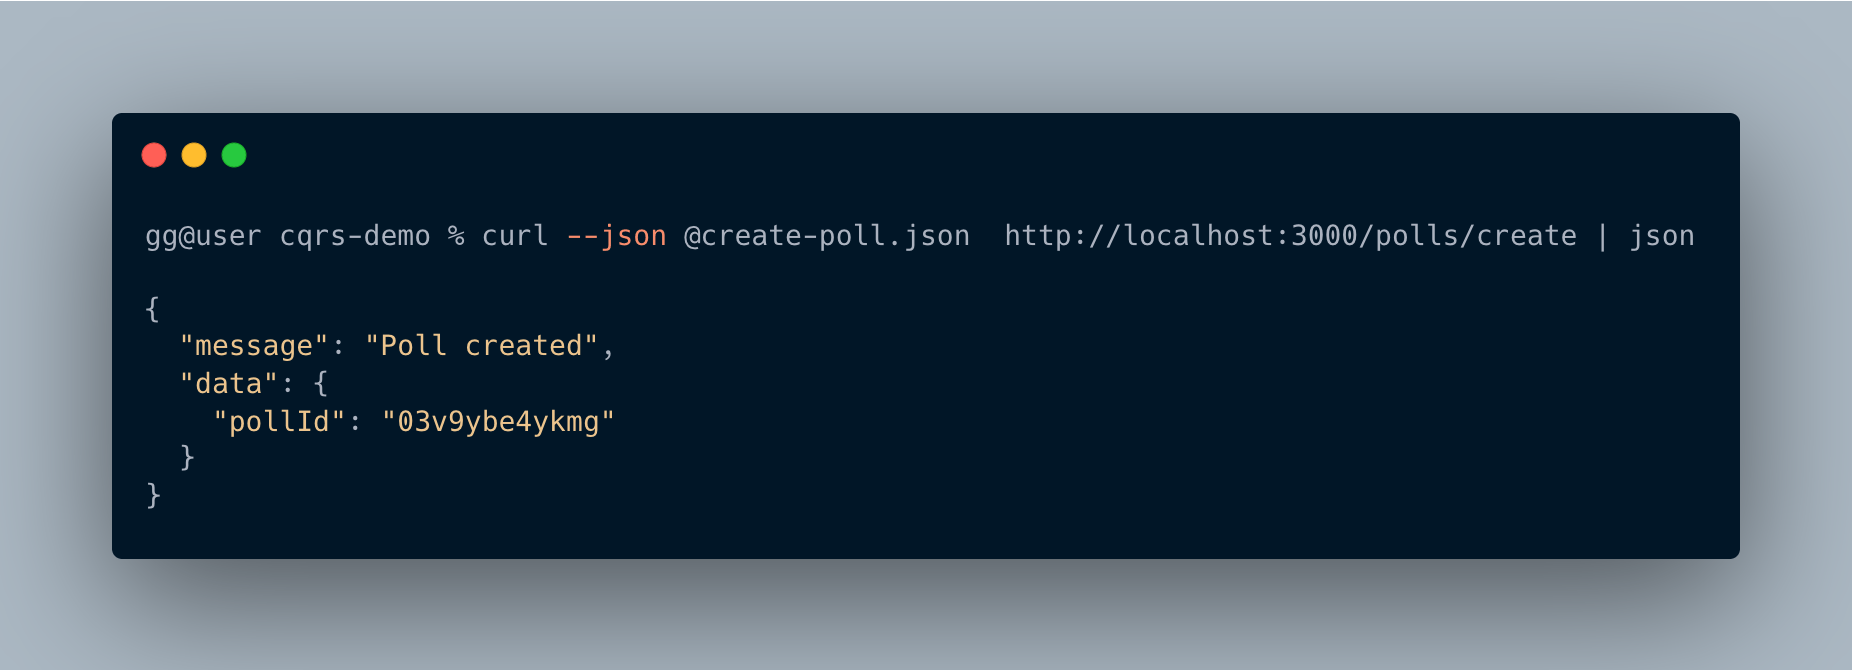
We've injected the command bus into our constructor. In the create poll route, we extract the request body, map it to the CreatePollCommand, and dispatch it to the system. The command bus then retrieves the correct command handler, invokes its execute method, and passes the command payload.
Again, let's test our application. We created a file named create-poll.json that holds sample poll data:
{
  "name": "who is your favorite footballer",
  "options": [
    "messi",
    "ronaldo",
    "Saurez"
  ]
}
Now, let's test the endpoint:
Events
In this section, we will explore events and the event bus that enables their dispatch. Our application will feature two events:
- Poll created event: This event will be triggered after a poll is successfully created.
- Voted event: This event will be triggered after a user casts a vote.
As we've approached previous sections, our primary interest is in getting things to work, rather than the intricate logic of our event handlers. The goal here is to demonstrate how we can communicate with the event bus both directly and indirectly to dispatch events.
Direct interaction with the event bus simply means injecting the event bus and calling its methods directly, similar to how we interacted with the query and command buses. Indirect interaction involves interacting with other abstracted entities that sit atop the event bus.
Direct Interaction with the Event Bus
Let's update the create-poll.handler.ts file with the following:
import { Injectable } from "@nestjs/common";
import { CommandHandler, EventBus, ICommandHandler } from "@nestjs/cqrs";
import { CreatePollCommand } from "./create-poll.command";
import { PollsService } from "src/polls/service/polls-service";
import { Poll } from "src/polls/poll.interface";
import { PollCreatedEvent } from "src/polls/events/poll-created/poll-created.event";

@Injectable()
@CommandHandler(CreatePollCommand)
export class CreatePollHandlerService implements ICommandHandler<CreatePollCommand> {
  constructor(
    private readonly pollService: PollsService,
    private readonly eventBus: EventBus
  ) {}

  async execute(command: CreatePollCommand): Promise<{ id: string }> {
    const { name, options } = command.pollData;
    const poll: Poll = {
      id: Math.random().toString(36).replace(".", ""),
      name,
      createdAt: new Date(),
      options: options.map((option) => ({
        option,
        votes: 0
      })),
      ended: false,
    };
    this.pollService.savePoll(poll);
    this.eventBus.publish(new PollCreatedEvent(poll.id));
    return { id: poll.id };
  }
}
This snippet shows that command handlers can also emit events. To dispatch an event after creating a poll, we inject the event bus, then call its publish() method, passing our PollCreatedEvent instance (which we'll create next).
All our events will reside in a folder named events. Run the following commands in your terminal:
mkdir -p events/poll-created
cd events/poll-created
touch poll-created.event.ts poll-created.handler.ts
Update the poll-created.event.ts file with the following:
export class PollCreatedEvent {
  constructor(public readonly pollId: string) {}
}
Next, let's update the poll-created.handler.ts file to handle the event:
import { Injectable } from '@nestjs/common';
import { EventsHandler, IEventHandler } from '@nestjs/cqrs';
import { PollCreatedEvent } from './poll-created.event';

@EventsHandler(PollCreatedEvent)
export class PollCreatedEventHandlerService implements IEventHandler<PollCreatedEvent> {
  async handle(event: PollCreatedEvent) {
    console.log("yay! a new poll was created");
  }
}
The @EventsHandler decorator marks the PollCreatedEventHandlerService as an event handler for the PollCreatedEvent. All event handlers must implement the IEventHandler interface, which has a single method called handle().
Again, we need to register our event handler as a provider:
import { Module } from "@nestjs/common";
import { PollsController } from "./controllers/polls.controller";
import { PollsService } from "./service/polls-service";
import { GetPollHandlerService } from "./queries/get-poll/get-poll.handler";
import { CreatePollHandlerService } from "./commands/create-poll/create-poll.handler";
import { PollCreatedEventHandlerService } from "./events/poll-created/poll-created.handler";

@Module({
  controllers: [PollsController],
  providers: [
    PollsService,
    GetPollHandlerService,
    CreatePollHandlerService,
    PollCreatedEventHandlerService,
  ],
})
export class PollsModule {}
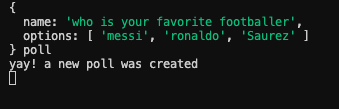
Now, when we restart our NestJS application and try to create a poll, we will see the dummy message printed by the event handler, as shown below:
Indirect Interaction with the Event Bus
Here, we will explore the AggregateRoot class and the EventPublisher class, both provided by the @nestjs/cqrs module, which are used to interact with the event bus. Here is an image illustrating a simple flow between the three:
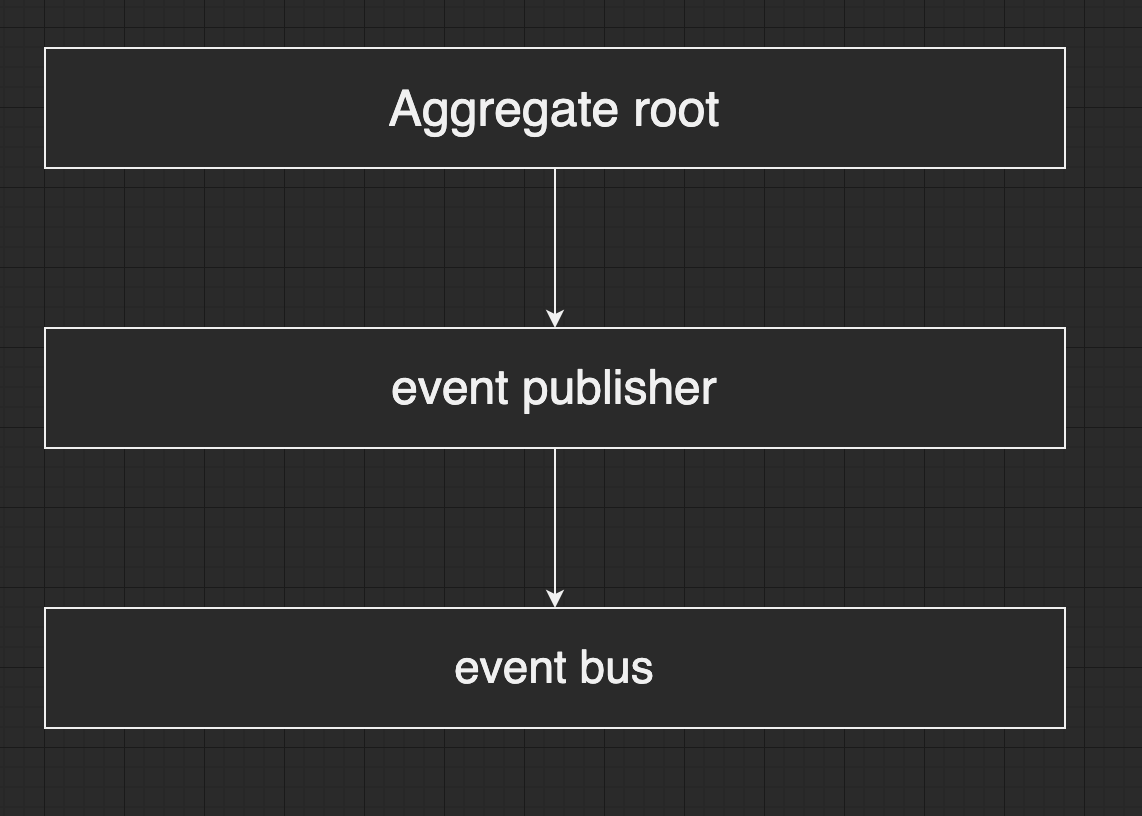
When building applications following Domain-Driven Design (DDD), we might have a model containing business logic that needs to dispatch events, but this model may not be able to directly inject dependencies.
To understand this indirect communication, let's now create our vote command. In the polls folder, run the following commands:
mkdir -p commands/vote-poll
touch commands/vote-poll/vote-poll.command.ts commands/vote-poll/vote-poll.handler.ts
Update the vote-poll.command.ts file with the following:
export class VotePollCommand {
  constructor(public readonly pollId: string, public readonly option: string) {}
}
Next, update commands/vote-poll/vote-poll.handler.ts file with the following:
import { Injectable } from "@nestjs/common";
import {
  AggregateRoot,
  CommandHandler,
  EventPublisher,
  ICommandHandler,
} from "@nestjs/cqrs";
import { VotePollCommand } from "./vote-poll.command";
import { PollsService } from "src/polls/service/polls-service";
import { VotedEvent } from "src/polls/events/voted/voted.event";

@CommandHandler(VotePollCommand)
export class VotePollHandlerService
  extends AggregateRoot
  implements ICommandHandler<VotePollCommand>
{
  constructor(
    private readonly pollRepository: PollsService,
    private publisher: EventPublisher
  ) {
    super();
  }

  async execute(command: VotePollCommand): Promise<void> {
    const { pollId, option } = command;
    this.pollRepository.votePoll(pollId, option);
    this.publisher.mergeObjectContext(this);
    console.log("voted");
    this.apply(new VotedEvent(pollId));
    this.commit();
  }
}
By making our model class extend the AggregateRoot class, it gains access to additional methods like publish and publishAll (though apply and commit are more commonly used with aggregates).
We also injected the EventPublisher, which has two main methods: mergeClassContext() and mergeObjectContext(). These functions expect a class or an object, respectively, as parameters, and internally connect them to the event bus. This is achieved by defining concrete implementations for the publishAll() and publish() methods within the aggregate, which in turn invoke those of the event bus.
By making VotePollHandlerService extend the AggregateRoot class and connecting it to the event bus via the this.publisher.mergeObjectContext(this) call, it can now emit events by calling the apply() method. This method accepts a variable number of events, which are then batched. We then call commit(), which subsequently publishes these events to the event bus stream. We can also configure auto-commits so that the apply() call automatically publishes them.
We need to create the VotedEvent and its handler.
mkdir -p events/voted
touch events/voted/voted.event.ts events/voted/voted.handler.ts
events/voted/voted.event.ts:
export class VotedEvent {
  constructor(public readonly pollId: string) {}
}
events/voted/voted.handler.ts:
import { Injectable } from '@nestjs/common';
import { EventsHandler, IEventHandler } from '@nestjs/cqrs';
import { VotedEvent } from './voted.event';

@EventsHandler(VotedEvent)
export class VotedEventHandlerService implements IEventHandler<VotedEvent> {
  async handle(event: VotedEvent) {
    console.log(`Poll ${event.pollId} received a vote.`);
  }
}
Let's update polls.module.ts to include VotePollHandlerService and VotedEventHandlerService.
import { Module } from "@nestjs/common";
import { PollsController } from "./controllers/polls.controller";
import { CreatePollHandlerService } from "./commands/create-poll/create-poll.handler";
import { PollsService } from "./service/polls-service";
import { GetPollHandlerService } from "./queries/get-poll/get-poll.handler";
import { PollCreatedEventHandlerService } from "./events/poll-created/poll-created.handler";
import { VotePollHandlerService } from "./commands/vote-poll/vote-poll.handler";
import { VotedEventHandlerService } from "./events/voted/voted.handler";

@Module({
  controllers: [PollsController],
  providers: [
    PollsService,
    GetPollHandlerService,
    CreatePollHandlerService,
    PollCreatedEventHandlerService,
    VotePollHandlerService,
    VotedEventHandlerService,
  ],
})
export class PollsModule {}
And update polls.controller.ts to dispatch the VotePollCommand.
import {
  Body,
  Controller,
  Delete,
  Get,
  HttpStatus,
  Param,
  Patch,
  Post,
} from "@nestjs/common";
import { CommandBus, QueryBus } from "@nestjs/cqrs";
import { CreatePollCommand } from "../commands/create-poll/create-poll.command";
import { GetPollQuery } from "../queries/get-poll/get-poll.query";
import { VotePollCommand } from "../commands/vote-poll/vote-poll.command";
import { CreatePollDto } from "../dto/create-poll.dto";

interface VotePollDto {
  poll_id: string;
  option: string;
}

@Controller("polls")
export class PollsController {
  constructor(
    private readonly commandBus: CommandBus,
    private readonly queryBus: QueryBus
  ) {}

  @Post("create")
  async createPoll(@Body() createPollDto: CreatePollDto) {
    const res = await this.commandBus.execute(new CreatePollCommand(createPollDto));
    return {
      message: "Poll created",
      data: {
        pollId: res.id,
      },
    };
  }

  @Post("/vote")
  async votePoll(@Body() votePollDto: VotePollDto) {
    await this.commandBus.execute(new VotePollCommand(votePollDto.poll_id, votePollDto.option));
    return { message: "Vote cast successfully" };
  }

  @Get(":id")
  async getPoll(@Param("id") id: string) {
    const poll = await this.queryBus.execute(new GetPollQuery(id));
    return poll;
  }
}
Sagas
In the code above, the VotePollHandlerService also emits an event called VotedEvent. We could handle this event by defining an event listener using the pattern described earlier. However, I will introduce another way to write one or more listeners using a saga.
All our sagas will reside in a folder named sagas:
mkdir sagas
touch sagas/poll-sagas.ts
Update the sagas/poll-sagas.ts file with the following:
import { Injectable } from "@nestjs/common";
import { ofType, Saga } from "@nestjs/cqrs";
import { map, Observable, tap } from "rxjs";
import { VotedEvent } from "../events/voted/voted.event";
import { PublishPollResultCommand } from "../commands/publish-result/publish-result.command";

@Injectable()
export class PollSagas {
  @Saga()
  userVoted(events$: Observable<any>): Observable<PublishPollResultCommand> {
    return events$.pipe(
      ofType(VotedEvent),
      tap((e) => console.log(`Vote received for poll ${e.pollId}`)),
      map((event) => new PublishPollResultCommand(event.pollId))
    );
  }
}
Sagas are providers that allow us to listen to one or more events. In the code above, we have one saga named userVoted. Sagas must use the @Saga decorator. The primary goal of sagas is to listen for events and then dispatch commands. The saga function receives the event stream as its input. Here, we listen to the VotedEvent and then map that event to another command called PublishPollResultCommand to potentially publish the result of the vote to the user.
Our publish event (it should be PublishPollResultCommand as per the saga):
// commands/publish-result/publish-poll-result.command.ts
import { Command } from "@nestjs/cqrs";

export class PublishPollResultCommand extends Command<boolean> {
  constructor(public readonly pollId: string) {
    super();
  }
}
Its handler logic, which simply prints a message, looks like this. First, create the directory and files:
mkdir -p commands/publish-result
touch commands/publish-result/publish-poll-result.command.ts commands/publish-result/publish-poll-result.handler.ts
Then, commands/publish-result/publish-poll-result.handler.ts:
import { CommandHandler, ICommandHandler } from "@nestjs/cqrs";
import { PublishPollResultCommand } from "./publish-poll-result.command";

@CommandHandler(PublishPollResultCommand)
export class PublishPollResultCommandHandler implements ICommandHandler<PublishPollResultCommand> {
  async execute(command: PublishPollResultCommand): Promise<boolean> {
    console.log("sending message to voter about poll results...");
    return true;
  }
}
To conclude, let's add all our providers to our polls.module.ts file:
import { Module } from "@nestjs/common";
import { PollsController } from "./controllers/polls.controller";
import { CreatePollHandlerService } from "./commands/create-poll/create-poll.handler";
import { PollsService } from "./service/polls-service";
import { GetPollHandlerService } from "./queries/get-poll/get-poll.handler";
import { VotePollHandlerService } from "./commands/vote-poll/vote-poll.handler";
import { PollSagas } from "./sagas/poll-sagas";
import { PublishPollResultCommandHandler } from "./commands/publish-result/publish-poll-result.handler";
import { PollCreatedEventHandlerService } from "./events/poll-created/poll-created.handler";
import { VotedEventHandlerService } from "./events/voted/voted.handler";

@Module({
  controllers: [PollsController],
  providers: [
    PollsService,
    GetPollHandlerService,
    CreatePollHandlerService,
    VotePollHandlerService,
    PollSagas,
    PublishPollResultCommandHandler,
    PollCreatedEventHandlerService,
    VotedEventHandlerService,
  ],
})
export class PollsModule {}
To trigger our vote endpoint, we've created a dummy payload in the vote.json file.
{
  "poll_id": "1",
  "option": "React"
}
Run the following command in your terminal:
curl --json @vote.json http://localhost:3000/polls/vote
You should see messages from the vote command handler, the saga, and the voted event handler.

Conclusion
CQRS offers a superior alternative for building larger server-side applications compared to CRUD, and it integrates exceptionally well with Domain-Driven Design. It provides a distinct way of conceptualizing server-side applications.
Although it entails writing more code and requires additional understanding, CQRS equips developers with foresight into available options for building server-side applications, helping them make more informed decisions when tackling architectural challenges.