Docker Workbook: Your Comprehensive Guide to Containerization
Master containerization with this in-depth Docker workbook. Learn to understand, manage, and optimize containers using Docker and Docker Compose for robust, production-grade applications.

Gmkziz 👓
07 Nov 2025 • 23 min read

Photo by Venti Views / Unsplash
Introduction
Container technology, when properly implemented, offers significant advantages such as enhanced portability, maintainability, scalability, and security for your application ecosystem.
Containers encapsulate software and all its dependencies into a single process designed to run on a Linux host machine. This powerful isolation is made possible by core Linux functionalities like chroot, namespaces, and control groups.
Specifically, namespaces define the resources a container can perceive, while cgroups determine the resources it can utilize and in what quantities. Containers share the Linux host machine's Kernel, directly access host hardware, and maintain isolation from each other.
Container runtimes are the software components responsible for executing containers; prominent examples include Docker, Containerd, and CRI-O. While container technologies existed long before Docker, it was Docker's innovative approach and user-friendly interface that led to their widespread adoption.
How Docker Works
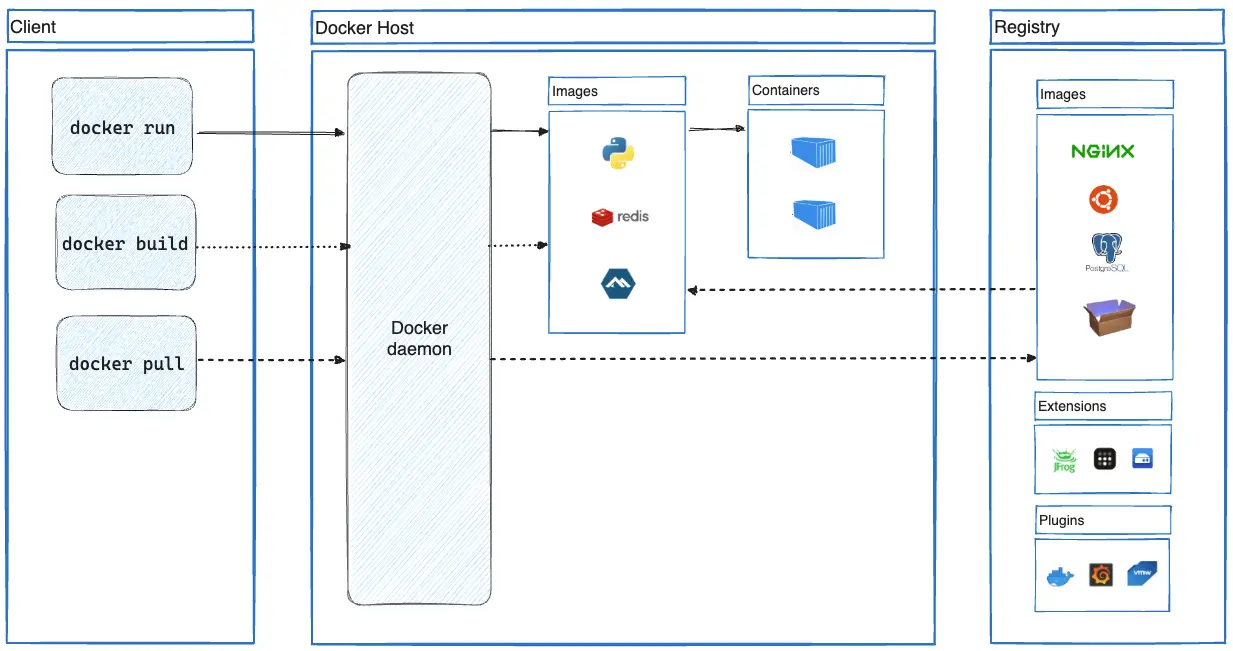 Docker Architecture
When you install Docker, you gain both a client (the docker command-line interface) and a daemon. The Docker Daemon typically runs in the background as a systemd service, receiving instructions from the Docker client to perform tasks such as downloading container images from registries, creating container images, and running containers. The client and daemon do not necessarily have to reside on the same machine. The machine hosting the daemon is referred to as a Docker Host.
For comprehensive details, refer to the official CLI references for the Docker client and Docker daemon.
Additionally, consult the reference documentation for all configuration directives related to the Docker client configuration file and Docker daemon configuration file.
Container Images
The Dockerfile
Dockerfile reference | Dockerfile instructions best practices
A container image is an absolute prerequisite for running containers. The standard file utilized for creating container images with Docker is called a Dockerfile. Within this file, you define a series of instructions that outline the image's contents.
The Common Dockerfile instructions section will introduce you to frequently used Dockerfile instructions and their specific characteristics. You can also initialize a sample Dockerfile for your project.
Once your Dockerfile is ready, you can create/build a container image from it using tools like Docker, Kaniko, or Buildah. To exclude specific files from the build context, you can employ a .dockerignore file.
Furthermore, it is advisable to adhere to best practices when crafting Dockerfile instructions.
For language-specific guidance, explore the Docker language-specific guides: PHP, Python, Java, Ruby, Go, JavaScript, Rust, R.
Lines written within the Dockerfile are processed by Docker parsers. You can customize the parser's behavior using Parser directives, which are written as special comments in the format # directive=value inside the Dockerfile. These can be used, for instance, to select the Dockerfile syntax, define escape characters, or configure how build checks are evaluated.
Container Registries
Container Registry services provide storage for container images. They are typically accessible remotely and facilitate the sharing of container images.
Docker Container Registry is one of the most widely recognized publicly available container registries. When you run a container with Docker, for example, without specifying a particular container registry for downloading/pulling the image, Docker Hub is used by default.
Creating Container Images from a Dockerfile
Navigate to the directory containing your Dockerfile and execute the following command. The image tag is optional; if omitted, 'latest' will be used:
# Syntax
docker build -t <image_name>[:<image_tag>] .

# Example
docker build -t myapp:0.1.0 .
If you intend to later push the built image to a remote container registry, the '<image_name>' should correspond to the full URL of the image within that registry. Here's an example:
docker build -t myregistry.example.com/myapp:0.1.0 .
For more options, use 'docker build --help'. Additionally, be aware of these best practices when creating container images.
Pushing Container Images into Registries
Before pushing your locally built images to remote container registries, ensure they have been properly tagged during the build process. The full image URL should follow this format:
# Registry image URL
<registry_url>/<image_name>:<image_tag>

# Examples
myregistry.example.com/tools/myapp:0.1.0
myregistry.example.com/superapp:0.1.0
Once the image is correctly tagged, authenticate with the container registry (if required) using the following command:
# Syntax
docker login <registry_domain_name>

# Example
docker login myregistry.example.com
Then, use the following command to push the image to the registry:
# Syntax
docker push <registry_image_url>

# Examples
docker push myregistry.example.com/tools/myapp:0.1.0
docker push myregistry.example.com/superapp:0.1.0
Builders
Docker internally employs builders when you construct container images. The default builder in Docker is BuildKit, which comes bundled with the Docker Engine and is used by default for image builds.
Buildx can be utilized to extend build capabilities with BuildKit. Through buildx, you can configure various build drivers when creating new builders.
Here are sample commands for managing Docker builders with buildx:
List builders:
$ docker buildx ls
NAME/NODE     DRIVER/ENDPOINT   STATUS    BUILDKIT   PLATFORMS
default*      docker
 \_ default    \_ default       running   v0.21.0    linux/amd64 (+4), linux/386
Create a new builder that uses the 'docker-container' build driver. This will run a BuildKit container for each build instead of leveraging the BuildKit instance bundled inside the Docker Engine:
# Create the new builder
$ docker buildx create \
  --name container-builder \
  --driver docker-container

# Verify
$ docker buildx ls
NAME/NODE                DRIVER/ENDPOINT                   STATUS     BUILDKIT   PLATFORMS
container-builder        docker-container
 \_ container-builder0    \_ unix:///var/run/docker.sock   inactive
default*                 docker
 \_ default               \_ default                       running    v0.21.0    linux/amd64 (+4), linux/386
Set the newly created builder called 'container-builder' as the default builder. The builder to use can also be selected by setting its name in the BUILDX_BUILDER environment variable or by using the --builder flag when running the docker build or docker buildx build command.
# Set the newly created builder as the default one
$ docker buildx use container-builder

# Verify
$ docker buildx ls
NAME/NODE                DRIVER/ENDPOINT                   STATUS     BUILDKIT   PLATFORMS
container-builder*       docker-container
 \_ container-builder0    \_ unix:///var/run/docker.sock   inactive
default                  docker
 \_ default               \_ default                       running    v0.21.0    linux/amd64 (+4), linux/386

# The asterix (*) indicates
# the default builder
Image Layering / Caching
Each instruction within a Dockerfile generates a new layer on top of the current image. Understanding how Docker build caches operate can significantly accelerate container image builds.
Common Dockerfile Instructions
Dockerfile reference | Dockerfile instructions best practices
FROM
The FROM instruction initializes a new build stage and sets the base image for subsequent instructions. Using multiple FROM instructions within the same Dockerfile initiates a multi-stage build. Image assets from previous build stages can then be reused in subsequent stages.
# Syntax
FROM [--platform=<platform>] <image>[:<tag> | @digest] [AS <name>]
The platform is specified as 'os/arch', for example: 'linux/amd64' or 'windows/arm64'.
The name assigned to a stage can then be used as follows:
# Create a new build stage using the previous stage image as the base image
FROM <name>

# Copy a file from a specific named build stage into this current stage image
COPY --from=<name> <src> ... <dest>

# Inject files or directories from a specific named
# build stage into this current stage image
RUN --mount=type=bind,from=<name>,target=<target_path>
COPY
COPY is used to transfer files from the build context or from a multi-stage build stage to the image's filesystem. These copied files persist in the final image. To temporarily add files from the build context—for a RUN command, for instance—use bind mounts as shown below:
RUN --mount=type=bind,source=requirements.txt,target=/tmp/requirements.txt \
    pip install --requirement /tmp/requirements.txt
Bind mounts offer greater efficiency than COPY. Here are examples using COPY:
# Copy from the build context
COPY --chown=www-data:www-data --chmod=755 conf/php-config.ini "$PHP_INI_DIR/conf.d/"

# Copy from a build stage (in multi-stage build)
COPY --chown=www-data:www-data --chmod=755 --from=replace conf/nginx.conf $NGINX_CONF_PATH
ADD
In addition to copying files from the build context to the image's filesystem, ADD can also download files from remote HTTPS and Git URLs, verify file checksums, and more. It can automatically extract tar files when adding them into image filesystems from the build context.
Here are examples of using ADD:
# Add a file from a remote HTTPS URL into the image
ADD https://example.com/myfile.zip /files/

# Add files from a remote Git repository into the image
ADD git@my.repo.example:web/app.git /app
ARG
ARG facilitates the use of build-time variables, which are exclusively available during the image build process and are not persisted in the final image. It's important to note that the ARG instruction is unsuitable for storing sensitive information (e.g., API keys, passwords) because these values will be visible when using the docker history command.
Here are examples of using ARG:
# Declare one or many build-time variables
ARG myvar1=myvalue1 MYVAR2=myvalue2 MYVAR3
During the build process, you can also set or override previously declared build-time variables as follows:
$ docker build -t myapp:1.0.1 \
   --build-arg myvar1=myvalue2 \
   --build-arg MYVAR3=myvalue3 .
If you need to inject sensitive data into the build context for a specific command, use RUN --mount=type=secret.
Here are examples of injecting secret data into the build context:
Here are examples to illustrate the scopes of build-time variables:
# These variables have a global scope. They will be available for all
# the FROM instructions but not inside the build stages themselves.
ARG IMAGE_STAGE1=ubuntu
ARG IMAGE_STAGE2=debian

FROM ${IMAGE_STAGE1} AS stage1 # variable accessible here
# Should be redeclared inside this stage in order to use it
ARG IMAGE_STAGE1
RUN echo "Hello from ${IMAGE_STAGE1}"

FROM ${IMAGE_STAGE2} AS stage2 # variable accessible here
# Should be redeclared inside this stage in order to use it
ARG IMAGE_STAGE2
RUN echo "Hello from ${IMAGE_STAGE2}"
ENV
The ENV instruction sets environment variables that are available for subsequent instructions within the Dockerfile (similar to ARG). However, unlike ARG, these variables will also be accessible within the environment of containers created from the resulting image.
# Syntax
ENV <varname>=<value> [<key>=<value>...]
Such variables can be overridden when launching containers with the docker run command, using the --env varname=value or -E varname=value flags.
RUN
The RUN instruction is used to execute commands essential for constructing the image. Each executed RUN command creates a new layer on top of the current image, which is then utilized in the subsequent Dockerfile step.
Here is the syntax:
# Shell form:
RUN [OPTIONS] <command> ...

# Exec form:
RUN [OPTIONS] [ "<command>", ... ]
Here are some usage examples:
# Using heredocs

RUN <<EOF
apt update
apt install -y curl zip
EOF

# Using escape

RUN apt update && \
    apt install -y \
    curl \
    zip
ENTRYPOINT and CMD
These two instructions define the container's initial command, which executes during startup and creates a process with PID 1. The following examples clarify their behavior.
Let's build the example1 image, run a container using it, and observe the outcome:
Example 1 Dockerfile content:
FROM ubuntu
CMD ["echo", "hello"]
Build the example1 image:
$ docker build -t example1 .
[+] Building 0.2s (5/5) FINISHED                                                                                                                                             docker:default
 => [internal] load build definition from Dockerfile                                                                                                                                   0.0s
 => => transferring dockerfile: 198B                                                                                                                                                   0.0s
 => [internal] load metadata for docker.io/library/ubuntu:latest                                                                                                                       0.1s
 => [internal] load .dockerignore                                                                                                                                                      0.0s
 => => transferring context: 2B                                                                                                                                                        0.0s
 => CACHED [example1 1/1] FROM docker.io/library/ubuntu:latest@sha256:66460d557b25769b102175144d538d88219c077c678a49af4afca6fbfc1b5252                                                 0.0s
 => exporting to image                                                                                                                                                                 0.0s
 => => exporting layers                                                                                                                                                                0.0s
 => => writing image sha256:36423e8273020c1fc9186f698397a8d4524b46ecd0b638c4a3315ce1028ffcd6                                                                                           0.0s
 => => naming to docker.io/library/example1                                                                                                                                            0.0s
Launch a container using that image:
$ docker run example1
hello
The container runs, outputs 'hello' as expected, and exits because its command has terminated. If we launch the container again and specify another command, that new command will override the one defined by the Dockerfile's CMD instruction:
$ docker run example1 cat /etc/issue
Ubuntu 24.04.3 LTS
 \l
Now, let's build and run the example2 image using ENTRYPOINT instead of CMD to observe the difference:
Example 2 Dockerfile content:
FROM ubuntu
ENTRYPOINT ["echo", "hello"]
Build the example2 image:
$ docker build -t example2 .
[+] Building 0.2s (5/5) FINISHED                                                                                                                                             docker:default
 => [internal] load build definition from Dockerfile                                                                                                                                   0.0s
 => => transferring dockerfile: 198B
(...)
Launch a container using that image:
$ docker run example2
hello
Again, the container runs, outputs 'hello', and exits. However, if we launch it again and specify another command, this new command will not override the Dockerfile's ENTRYPOINT instruction. Instead, it will be appended as an argument to the ENTRYPOINT command:
$ docker run example2 cat /etc/issue
hello cat /etc/issue
The example2 container executes echo hello cat /etc/issue rather than replacing echo hello with cat /etc/issue, as seen in example1. Nevertheless, it's possible to reset the ENTRYPOINT during container launch to run a completely new command if needed:
$ docker run --entrypoint="" example2 cat /etc/issue
Ubuntu 24.04.3 LTS
 \l
By resetting the ENTRYPOINT, we can run the cat /etc/issue command, mirroring the behavior of example1.
When containerizing a CLI program, for instance, ENTRYPOINT is generally preferred over CMD as it offers a more intuitive user experience:
# Running a containerized version of mycli program
docker run mycli --help
docker run mycli <ARGS>
Users can directly interact with the CLI program's flags and arguments without needing to explicitly call the program within the docker run command.
Another scenario involves combining ENTRYPOINT and CMD within a Dockerfile:
Example 3 Dockerfile content:
FROM ubuntu
ENTRYPOINT ["echo"]
CMD ["hello"]
Build the example3 image:
docker build -t example3 .
[+] Building 3.3s (5/5) FINISHED                                                                                                                                             docker:default
 => [internal] load build definition from Dockerfile                                                                                                                                   0.0s
 => => transferring dockerfile: 83B                                                                                                                                                    0.0s
 => [internal] load metadata for docker.io/library/ubuntu:latest                                                                                                                       0.6s
 => [internal] load .dockerignore                                                                                                                                                      0.0s
 => => transferring context: 2B                                                                                                                                                        0.0s
 => [1/1] FROM docker.io/library/ubuntu:latest@sha256:66460d557b25769b102175144d538d88219c077c678a49af4afca6fbfc1b5252                                                                 2.5s
 => => resolve docker.io/library/ubuntu:latest@sha256:66460d557b25769b102175144d538d88219c077c678a49af4afca6fbfc1b5252                                                                 0.0s
 => => sha256:d22e4fb389065efa4a61bb36416768698ef6d955fe8a7e0cdb3cd6de80fa7eec 424B / 424B                                                                                             0.0s
 => => sha256:97bed23a34971024aa8d254abbe67b7168772340d1f494034773bc464e8dd5b6 2.30kB / 2.30kB                                                                                         0.0s
 => => sha256:4b3ffd8ccb5201a0fc03585952effb4ed2d1ea5e704d2e7330212fb8b16c86a3 29.72MB / 29.72MB                                                                                       0.5s
 => => sha256:66460d557b25769b102175144d538d88219c077c678a49af4afca6fbfc1b5252 6.69kB / 6.69kB                                                                                         0.0s
 => => extracting sha256:4b3ffd8ccb5201a0fc03585952effb4ed2d1ea5e704d2e7330212fb8b16c86a3                                                                                              1.8s
 => exporting to image                                                                                                                                                                 0.0s
 => => exporting layers                                                                                                                                                                0.0s
 => => writing image sha256:16805ffadd43c7f568fb26de593c3baf2b4c756c0be65af397c7ec5a2581681c                                                                                           0.0s
 => => naming to docker.io/library/example3
Launch a container using that image:
$ docker run example3
hello
In this example, 'hello' is an argument to the echo command, defined by CMD, not ENTRYPOINT itself. This configuration sets 'hello' as the default argument for the command defined by the ENTRYPOINT instruction. Consequently, running the example3 container yields the same output: 'hello'. Users can easily override this default argument:
$ docker run example3 Welcome to hackerstack.org
Welcome to hackerstack.org
Finally, let's explore how the container's first command's state and execution mode (foreground/background) influence the container's own state.
We will use the following Dockerfile for all subsequent examples, modifying only the content of script.sh:
FROM ubuntu
COPY script.sh /opt
ENTRYPOINT ["/opt/script.sh"]
Scenario 1: The container's first command exits successfully.
The container's status, as shown in the 'STATUS' column of docker ps, will be 'Exited (0)'.
Content of script.sh:
#!/bin/bash

echo "Exiting with exit code 0"
exit 0
After building an example image with this script:
$ docker run example
Exiting with exit code 0

$ docker ps -a
CONTAINER ID   IMAGE          COMMAND             CREATED          STATUS                        PORTS     NAMES
fd33afbaf973   example        "/opt/script.sh"    8 seconds ago    Exited (0) 8 seconds ago                clever_northcutt
Scenario 2: The container's first command exits unsuccessfully.
The container's status will be 'Exited (1)'.
Content of script.sh:
#!/bin/bash

echo "Exiting with exit code 1"
exit 1
After building an example image with this script:
$ docker run example
Exiting with exit code 1

$ docker ps -a
CONTAINER ID   IMAGE          COMMAND             CREATED          STATUS                        PORTS     NAMES
84fc7e7854ed   example        "/opt/script.sh"    4 seconds ago    Exited (1) 3 seconds ago                angry_lichterman
Scenario 3: The container's first command keeps running in the foreground.
The container's status will be 'Up' followed by an uptime duration.
Content of script.sh:
#!/bin/bash

echo "Keeping a command running in foreground"
sleep 300 # 300 seconds
After building an example image with this script:
$ docker run example
Keeping a command running in foreground
# the docker run command also runs in the
# foreground and blocks shell interaction

# To run the docker command in background, we can
# use the -d flag as follows

$ docker run -d example
129bab01dc1a1b3529aa620943d432fcd7ce7c5b882cc0575afb01f5bb9f8e05

# Show running containers

$ docker ps
CONTAINER ID   IMAGE     COMMAND            CREATED         STATUS         PORTS     NAMES
129bab01dc1a   example   "/opt/script.sh"   2 minutes ago   Up 2 minutes             admiring_shamir
Scenario 4: The container's first command runs in the background.
Even though the script keeps a process running, the container's first process exits immediately, leading to a status of 'Exited (0)'.
Content of script.sh:
#!/bin/bash

echo "Keeping a command running in foreground"
sleep 300 &
$ docker run -d example
638bb58dd066da0cc43921bf0739eb9763f1ff14e46b85d06eb2fc6f66f5ea64

$ docker ps
CONTAINER ID   IMAGE     COMMAND   CREATED   STATUS    PORTS     NAMES

$ docker ps -a
CONTAINER ID   IMAGE          COMMAND            CREATED          STATUS                        PORTS     NAMES
638bb58dd066   example        "/opt/script.sh"   7 seconds ago    Exited (0) 6 seconds ago                crazy_nash
In all the previous examples, any text messages sent to standard output (stdout) or standard error (stderr) via the echo command or similar will be visible in the container's logs:
$ docker logs 638bb58dd066
Keeping a command running in foreground
To conclude this section, here are crucial rules to remember when working with ENTRYPOINT and CMD:
- At least one
ENTRYPOINTorCMDinstruction is mandatory within a Dockerfile. - If multiple
CMDinstructions are present, only the last one will be executed. ENTRYPOINTcan establish a default executable for the container. Any command executed through that container will serve as an argument to the executable defined byENTRYPOINT.- An
ENTRYPOINTinstruction can be followed by aCMDinstruction to define default arguments for the executable specified byENTRYPOINT. Users can override these defaultCMDarguments by providing new ones when launching the container. - The state of a container is directly tied to the state of its first process (the process with PID 1).
- If no
ENTRYPOINTinstruction exists, the process with PID 1 inside the container will be created from the executable specified in the lastCMDinstruction. - If an
ENTRYPOINTinstruction is present, the process with PID 1 inside the container will be created from the executable specified by theENTRYPOINTinstruction. - Container logs (retrieved with
docker logsor similar) originate from the container's standard output (stdout) and standard error (stderr). - The 'foreground' concept for the container's first process is critical, as it determines whether your container remains running. If the container's PID 1 process (created by
ENTRYPOINTorCMD) runs in the foreground, the container continues to run; otherwise, the container starts and then exits. - A common method for running daemon services within containers is to use a process control system like supervisord, as further explained here.
WORKDIR
WORKDIR specifies the working directory for subsequent instructions in the Dockerfile, such as RUN, COPY, CMD, ENTRYPOINT, and ADD. The directory will be created if it does not already exist. Usage example:
WORKDIR /app
USER
USER sets the user (and optionally the group) to be used for RUN instructions that follow it in the Dockerfile. This will also be the default user inside the container and will execute scripts/commands specified by subsequent ENTRYPOINT or CMD instructions. Usage examples:
# Using username:groupname
# groupname is optional
USER gmkziz:admin

# Using UID:GID
# GID is optional
USER 1001:900
EXPOSE
The EXPOSE instruction serves as informational metadata, highlighting a specific port on which the container is expected to listen. It does not actually publish or open the port on the host system.
Here is an example usage:
(...)

EXPOSE <port>
To publish the exposed port on the host when running the container, use the -p <host_port>:<container_port> flag with the docker run command.
Dockerfile Examples and Tips
Replacing variables inside config files by environment variables
This example utilizes Docker multi-stage builds to keep the final image size minimal.
Imagine you need to inject a configuration file into the image, where its content includes a variable declared within the Dockerfile for use across different build stages.
ARG APP_BASE_DIR=/app
FROM myimage
ARG APP_BASE_DIR
COPY conf/myfile.conf /etc/nginx/http.d/default.conf
(...)
The APP_BASE_DIR variable is declared once in the Dockerfile and holds the path to the application's base directory. The configuration file, myfile.conf, that we copy into the container, should also reflect the value of this APP_BASE_DIR variable.
To achieve this, we can create a template of the configuration file locally. Here's an example content:
File: myfile.conf.tpl
(...)
root {{ env "APP_BASE_DIR" }};
(...)
Then, inside the Dockerfile, we create a temporary stage to perform the variable replacement using the go-replace tool:
(...)
FROM webdevops/go-replace AS replace
ARG APP_BASE_DIR
WORKDIR /conf
RUN --mount=type=bind,source=./myfile.conf.tpl,target=myfile.conf.tpl,rw \
    --mount=type=cache,target=/tmp/cache \
    go-replace --mode=template myfile.conf.tpl:myfile.conf
This process will generate the /conf/myfile.conf file within that stage by replacing {{ env "APP_BASE_DIR" }} with /app.
You can then copy this finalized configuration file into the image during subsequent stages as follows:
COPY --from=replace conf/myfile.conf /etc/nginx/http.d/default.conf
Running multiple services inside the same container using supervisord
A common and reliable method for running multiple services within containers is to use a process control system like supervisord. supervisord will run as the ENTRYPOINT (PID 1) and launch the required services (e.g., Nginx and PHP-FPM).
Here is a sample Dockerfile snippet demonstrating the use of supervisord to start multiple services via an ENTRYPOINT script:
(...)
RUN apk update && apk add --no-cache supervisor
COPY --chown=www-data:www-data --chmod=755 conf/supervisord.conf /etc/supervisor/conf.d/supervisord.conf
COPY --chown=www-data:www-data --chmod=755 --from=replace conf/entrypoint.sh /usr/local/bin/entrypoint.sh
ENTRYPOINT ["entrypoint.sh"]
Here is an example content for the ENTRYPOINT script:
File: /usr/local/bin/entrypoint.sh
#!/bin/sh
set -e

# Start supervisord and pass it the configuration file
exec /usr/bin/supervisord -c /etc/supervisor/conf.d/supervisord.conf
In a container running, for instance, PHP-FPM and Nginx, supervisord can be configured to launch PHP-FPM in the background and Nginx in the foreground. It can also be configured to prevent saving its logs directly to the container's filesystem:
File: /etc/supervisor/conf.d/supervisord.conf
[supervisord]
nodaemon=true
logfile=/dev/null
logfile_maxbytes=0

[program:php-fpm]
command=php-fpm
autostart=true
autorestart=true
priority=5
stDOUT_logfile=/dev/stdout
stDOUT_logfile_maxbytes=0
stDERR_logfile=/dev/stderr
stDERR_logfile_maxbytes=0

[program:nginx]
command=nginx -g 'daemon off;'
autostart=true
autorestart=true
priority=10
stDOUT_logfile=/dev/stdout
stDOUT_logfile_maxbytes=0
stDERR_logfile=/dev/stderr
stDERR_logfile_maxbytes=0
With this configuration, the container will be considered 'running' as long as Nginx is active. Nginx logs sent to stdout will be visible when viewing the container's logs with the docker logs command. Here is a sample Nginx configuration file:
upstream php {
    server localhost:9000;
}

server {
        listen 80;
        server_name localhost;
        root /app;
        server_tokens off;

        location / {
                try_files $uri /index.php$is_args$args;
        }

        location ~ \.php(/|$) {
                include fastcgi_params;
                fastcgi_pass php;
                fastcgi_index index.php;
                fastcgi_param SCRIPT_FILENAME $document_root$fastcgi_script_name;
                error_log /dev/stdout;
                access_log /dev/stderr;
        }
}
Most importantly, supervisord will automatically restart PHP-FPM or Nginx processes in the event of a failure.
Using multi-stage builds
Here is an example for a PHP application where development and production dependencies are built within distinct stages. The outputs from these stages are then reused in subsequent development and production stages, from which the final app development or production image will be constructed.
Both development and production stages will originate from a common 'base' stage containing elements required for both environments (e.g., PHP and PHP extensions, application source code). This methodology allows for independent building of development and production images, each containing only the necessary dependencies, resulting in smaller image sizes.
Here is the stage for development dependencies:
FROM composer:lts AS dev-deps
WORKDIR /app
RUN --mount=type=bind,source=./src/composer.lock,target=composer.lock \
    --mount=type=bind,source=./src/composer.json,target=composer.json \
    --mount=type=cache,target=/tmp/cache \
    composer install --ansi --no-scripts --no-progress
And the stage for production dependencies:
FROM composer:lts AS prod-deps
WORKDIR /app
RUN --mount=type=bind,source=./src/composer.lock,target=composer.lock \
    --mount=type=bind,source=./src/composer.json,target=composer.json \
    --mount=type=cache,target=/tmp/cache \
    composer install --ansi --no-scripts --no-progress --no-dev
These two preceding stages will create a 'vendor' directory in /app, containing the required dependency files. We will then inject the corresponding 'vendor' directory into the final stages for development and production images.
Now, here is the 'base' stage that is common to both development and production environment images:
(...)
FROM php:8.4.14-fpm-alpine3.21 AS base
ARG APP_BASE_DIR
RUN apk update && apk add --no-cache \
      build-base \
      git \
      (...)
RUN docker-php-ext-install \
      gd \
      xml \
      (...)
COPY --chown=www-data:www-data --chmod=755 ./src "$APP_BASE_DIR"
(...)
WORKDIR $APP_BASE_DIR
And finally, the stage that will be used to build the development image:
FROM base AS development
RUN mv "$PHP_INI_DIR/php.ini-development" "$PHP_INI_DIR/php.ini"
COPY --chown=www-data:www-data --chmod=755 --from=dev-deps app/vendor /app/includes/vendor
ENTRYPOINT ["entrypoint.sh"]
EXPOSE 80
And the one for the production image:
FROM base AS production
RUN mv "$PHP_INI_DIR/php.ini-production" "$PHP_INI_DIR/php.ini"
COPY --chown=www-data:www-data --chmod=755 --from=prod-deps app/vendor /app/includes/vendor
ENTRYPOINT ["entrypoint.sh"]
EXPOSE 80
Managing containers with Docker
Launching containers
For detailed syntax and options, use:
docker run --help
Run a container using the busybox image to test connectivity to 'google.com' with the nc command:
docker run busybox nc -vz google.fr 80
Ensure the container is automatically removed from the list (shown with docker ps) after execution:
docker run --rm busybox nc -vz google.fr 80
Assign a name to the container:
docker run --name debug busybox nc -vz google.fr 80
Pass environment variables to the container:
$ docker run -e MYVAR=VALUE busybox env | grep MYVAR
MYVAR=VALUE
Mount a volume into the container:
$ docker run -v "$PWD/Test:/test" busybox ls /test
hello
Launch a container and access a shell inside it. To do this, simply run the desired shell command (e.g., bash, sh) when launching the container and use the -it flag:
# -i, --interactive: Keep STDIN open even if not attached
# -t, --tty: Allocate a pseudo-TTY

$ docker run -it busybox sh
/ # env
HOSTNAME=841da4299bb8
SHLVL=1
HOME=/root
TERM=xterm
PATH=/usr/local/sbin:/usr/local/bin:/usr/sbin:/usr/bin:/sbin:/bin
PWD=/
Executing commands inside running containers
For detailed syntax and options, use:
docker exec --help
Execute the ls command inside a running container named myapp:
docker exec myapp ls
Get a shell inside a running container named myapp:
# Sh
docker exec -it myapp sh

# Bash
docker exec -it myapp bash
Listing containers and images
For detailed command syntax and options, use:
# Help on listing containers
docker ps --help

# Help on listing container images
docker images --help
List running containers:
docker ps
List all containers (running or not):
docker ps -a
List container images:
docker images
Inspecting containers
For detailed syntax and options, use:
docker inspect --help
Inspect the container named myapp:
docker inspect myapp
The docker inspect command is not limited to containers; it can also be used for other Docker objects like images, volumes, etc.:
# Inspecting a docker image
docker inspect myimage

# Inspecting a docker volume
docker inspect myvolume
Viewing containers logs
For detailed syntax and options, use:
docker logs --help
Show all available log lines for the container named myapp:
docker logs myapp
Show only the last 10 lines of logs for the container named myapp:
docker logs -n 10 myapp
Follow the logs output stream for the container named myapp, starting from the last 10 output lines:
docker logs -n 10 -f myapp
Limit containers output logs file size
The output of the docker logs command is, by default, sourced from a file stored at: /var/lib/docker/containers/<container_id>/<container_id>-json.log.
To control the size of this file on the Docker host/machine filesystem, the following directives can be added to the Docker daemon configuration file:
File: /etc/docker/daemon.json
{
  (...)
  "log-opts": {
    "max-size": "<max_size_of_log_files>",
    "max-file": "<max_number_of_log_files>"
  }
  (...)
}
Refer to Configure docker default logging driver for more details.
Viewing containers resources consumption
For detailed syntax and options, use:
docker stats --help
Display a live stream of containers' resource usage statistics:
docker stats
System info and unused data cleanup
# Info about the Docker client (version, mode, plugins, etc) and the Docker daemon
docker system info

# Info about data size used by images,
# containers, volumes, build caches
docker system df

# Remove unused data: images, containers,
# volumes, build caches
docker system prune [--all, --force]

# Cleanup only unused images, containers, volumes, etc
docker image|container|volume prune [--force]
Use a proxy for pulling docker images
You must configure the proxy at the Docker daemon level. We will demonstrate one method for doing this if you are using systemd as your system services manager.
Create the following drop-in configuration file:
File: /etc/systemd/system/docker.service.d/docker-service-override.conf
[Service]
Environment="https_proxy=<proxy_ip>:<proxy_port>"
Then, make the systemd daemon aware of the Docker service configuration file change by running:
systemctl daemon-reload
Finally, restart the Docker daemon using:
systemctl restart docker
Configure a proxy for all docker containers
This configuration ensures that all your running Docker containers utilize the specified proxy for their HTTP/HTTPS requests.
Add the following to the Docker client configuration file:
File: $HOME/.docker/config.json
{
  "proxies": {
    "default": {
      "httpProxy": "<proxy_ip>:<proxy_port>",
      "httpsProxy": "<proxy_ip>:<proxy_port>"
    }
  }
}
Managing containers with Docker Compose
What is Docker Compose?
Docker Compose is a supplementary tool designed for declaratively managing Docker containers. Instead of executing individual commands to run Docker containers, you define a configuration file that declares the containers you wish to run, along with their parameters (e.g., volumes, environment variables).
To install Docker Compose on Linux, refer to this guide. It functions as a plugin for Docker and is invoked via the docker compose command.
Creating a Docker Compose file
The most commonly used top-level section of a Docker Compose file is services. This is where you declare your containers and their associated parameters. Here's an example:
services:
  myapp-frontend:
    image: myapp
    container_name: myapp-frontend
    volumes:
      - source: $PWD/.env
        type: bind
        read_only: true
        target: /app/config/.env
    environment:
      DEBUG: false
      DATABASE_HOST: myapp-database
    ports:
      - "8000:80"

  myapp-database:
    image: mysql:8.0.43-bookworm
    container_name: myapp-database
    environment:
      MYSQL_ROOT_PASSWORD: "mysuperpass"
      MYSQL_DATABASE: "myapp"
    volumes:
      - source: /var/tmp/myapp-db-data
        type: bind
        read_only: false
        target: /var/lib/mysql
    depends_on:
      - myapp-frontend
Within the services top-level section, here are some other directives worth highlighting:
deploy: Configure resource requests and limits, number of replicas, etc.volumes: Mount volumes inside containers using bind mounts, Docker volumes, or data from container images.healthcheck: Configure health checks for your containers.dns: Configure DNS server addresses to use for DNS resolution within your containers.depends_on: Declare dependencies between your Docker Compose services.build: Build container images at launch from local source code directories.develop: Useful for local development to keep containers synchronized with application source code changes.
Development Docker Compose file
The primary objective of a local Docker Compose file is to simplify the process of launching an application locally for bug fixing or adding new features. Here's what we aim to achieve with a local development Docker Compose file:
- Automatically build the development image from local application source code and run it.
- Ensure local application source code changes are synchronized into the Docker container.
- Expose the relevant application ports to the local machine for application access and testing during development.
- Automatically run the required database and inject necessary data for the application.
services:
  myapp-frontend:
    # Build image from source code and Dockerfile
    # present inside the current directory (.)
    # Use 'dev' as the Dockerfile target to build the image
    build:
      context: .
      target: dev
    container_name: myapp-frontend
    # Mount required config files inside the container
    volumes:
      - source: $PWD/.env
        type: bind
        read_only: true
        target: /app/config/.env
    # Set environment variables for the container
    environment:
      DEBUG: false
      DATABASE_HOST: myapp-database
    # Expose the container port 80 on local machine port 8080
    ports:
      - "8000:80"
    # Make this service run only when the database service is ready
    depends_on:
      - myapp-database
    # Keep the /app directory inside the container in sync
    # with the local src directory containing the app source code
    develop:
      watch:
        - action: sync
          path: ./src
          target: /app

  myapp-database:
    image: mysql:8.0.43-bookworm
    container_name: myapp-database
    environment:
      MYSQL_ROOT_PASSWORD: "mysuperpass"
      MYSQL_DATABASE: "myapp"
    volumes:
      # Initialize the database with a dump file
      # when running for the first time
      - source: /var/tmp/dump.sql
        type: bind
        read_only: false
        target: /docker-entrypoint-initdb.d/dump.sql
      # Make database data persist on the local machine disk
      - source: /var/tmp/myapp-db-data
        type: bind
        read_only: false
        target: /var/lib/mysql
Running containers with Docker Compose
Start containers using Docker Compose:
# If the docker-compose.yaml configuration is
# located inside the current directory

# Start in the foreground
docker compose up

# When using the docker-compose.yaml
# develop.watch configuration directive
# you should use the --watch flag
docker compose up --watch

# Start in the background
docker compose up -d

# If the docker-compose.yaml configuration
# is located elsewhere, use the -f option to
# specify the path to the configuration file
docker compose -f $compose-config-file up
docker compose -f $compose-config-file up -d
Stop and restart containers using Docker Compose:
# Stop
docker compose [-f $compose-config-file] stop

# Restart
docker compose [-f $compose-config-file] restart
Should you wish to report a mistake, ask questions, or suggest improvements, please feel free to email me at gmkziz@hackerstack.org.
If you find my articles valuable, consider subscribing to my newsletter to receive the latest posts as soon as they are published.
Take care, keep learning, and I look forward to connecting in the next post! 🚀