Mastering Top Gun (NES) Carrier Landings: A Technical Deep Dive
Uncover the precise mechanics behind successful carrier landings in the classic NES game *Top Gun*. This guide details essential altitude, speed, and heading parameters, alongside a technical breakdown of game memory and disassembly, empowering players to master one of retro gaming's most challenging maneuvers.
Mastering the challenging carrier landing sequence in the classic NES game Top Gun has long been a pursuit for many players. For those seeking to perfect this intricate maneuver, a detailed reverse engineering analysis reveals the precise mechanics behind a successful landing. This guide will provide the essential parameters, allowing players to refine their technique and achieve flawless carrier landings.
Key Landing Parameters: To successfully land, your aircraft must meet specific criteria at the end of the sequence:
- Altitude: Must be within the range of 100-299 (inclusive).
- Speed: Must be within the range of 238-337 (inclusive).
- Heading: You must be laterally aligned with the aircraft carrier.
The landing phase in Top Gun (NES) presents players with a crucial test of precision. During this sequence, the game provides guidance via the Multi-Function Display (MFD), recommending 'Alt. 200 / Speed 288'—values situated comfortably within the acceptable ranges. Both altitude and speed are manipulated through throttle and pitch adjustments. While an explicit on-screen heading indicator is absent, the game provides audible cues (e.g., "Right! Right!") if lateral alignment is incorrect. It's important to note that the acceptable ranges for speed and heading are relatively narrow, demanding precise control, whereas the altitude range offers more flexibility.
After approximately one minute of flight during the landing approach, the game performs a state check. Based on your aircraft's parameters, a cutscene will either depict a perfect touchdown or an unfortunate crash. Regardless of the outcome, the mission is deemed 'Accomplished,' and players proceed to the next stage.
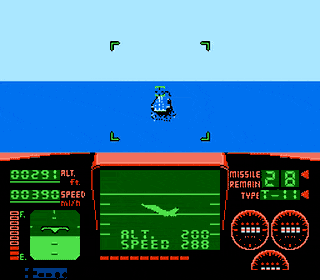 Illustrates the in-game carrier landing sequence.
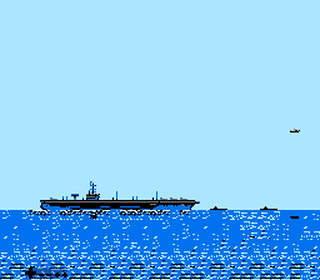 Depicts a failed landing, resulting in a crash.
Technical Insights into Landing Mechanics
For enthusiasts interested in the underlying game logic, a deeper dive into the NES memory reveals how these landing parameters are tracked and evaluated.
Memory Locations and Acceptable Ranges:
| Address | Contents | Acceptable Range (Inclusive) |
|---|---|---|
$40-$41 | Speed (Binary Coded Decimal) | 238 - 337 |
$3D-$3E | Altitude (Binary Coded Decimal) | 100 - 299 |
$FD | Heading (Range: -32 to +32) | 0 - 7 |
$9E | Landing State Check Result | 0 (Success) |
Speed and altitude values are stored using Binary Coded Decimal (BCD) format. This approach typically simplifies the rendering of numerical text on screen, as each decimal digit is represented by a 4-bit binary code. For instance, a decimal number like 1234 might be represented as 0x1234 in hexadecimal BCD.
The game's landing state check is handled by a function located at memory address $B6EA, which writes its result to $9E. A value of 0 at $9E signifies a successful landing. Other values correspond to different failure conditions, influencing the crash animation.
For those looking for a guaranteed successful landing without extensive practice, the Game Genie code AEPETA can be used.
Disassembly of the Landing Skill Check Function
Below is an annotated disassembly of the landing_skill_check function, providing a detailed look at the decision-making process for a successful carrier landing:
landing_skill_check:
    06:B6EA: LDA $3E    ; Load altitude High cent
    06:B6EC: BEQ $B724  ; Branch if High cent == 0 (altitude < 100)
    06:B6EE: CMP #$03
    06:B6F0: BCS $B720  ; Branch if High cent >= 3 (altitude >= 300)
    06:B6F2: LDA $41
    06:B6F4: CMP #$04
    06:B6F6: BCS $B720  ; Branch if High cent is >= 04 (speed >= 400)
    06:B6F8: CMP #$02
    06:B6FA: BCC $B724  ; Branch if High cent is < 02 (speed < 200)
    06:B6FC: BEQ $B706  ; Branch if High cent == 02 (speed >= 200 && speed <= 299)
speed_300s:
    06:B6FE: LDA $40    ; Load speed Low cent
    06:B700: CMP #$38
    06:B702: BCS $B720  ; Branch if Low cent >= 38 (speed >= 338)
    06:B704: BCC $B70C  ; Branch if Low cent < 38 (speed < 338)
speed_200s:
    06:B706: LDA $40
    06:B708: CMP #$38
    06:B70A: BCC $B724  ; Branch if speed < 238
speed_ok:
    06:B70C: LDA $FD    ; Load heading
    06:B70E: BMI $B718  ; Branch if heading < 0 (too far left)
    06:B710: CMP #$08
    06:B712: BCS $B71C  ; Branch if heading >= 8 (too far right)
    06:B714: LDX #$00   ; speed ok, heading ok; 0 == success
    06:B716: BEQ $B726  ; Branch to return
too_far_left:
    06:B718: LDX #$02
    06:B71A: BNE $B726
too_far_right:
    06:B71C: LDX #$04
    06:B71E: BNE $B726
too_fast_or_too_high:
    06:B720: LDX #$08
    06:B722: BNE $B726
too_slow_or_too_low:
    06:B724: LDX #$04
return:
    06:B726: STX $9E
    06:B728: RTS
This detailed analysis provides the knowledge required to consistently achieve successful carrier landings in Top Gun for the NES. By understanding and applying these precise parameters, players can master one of the game's most iconic challenges.